Mechanical Ventilation Basics
Joint Trauma System
MECHANICAL VENTILATION BASICS
SUMMARY OF CHANGES
- Added the Ventway Sparrow POI and Transport Ventilator. Set up and troubleshooting procedures. The Sparrow is added to the SOCOM List of approved ventilators and is becoming more common in the DoD/NATO Forces.
- Updated definitions on lung compliance.
- Updated other definitions with recent research support.
- Updated initial ventilator settings to recognize the Volume or Pressure support modes.
- Added recommendation on ventilator testing.
BACKGROUND
Intubation and mechanical ventilation are challenging skills in the austere environment and appropriate consideration must be taken when placing a patient on a mechanical ventilator. Ventilator management is resource intensive and demanding which might not make it appropriate for all tactical situations. If a patient is maintaining their airway and has appropriate oxygenation and ventilation, they should not be intubated by prehospital providers for transport from point of injury (POI) to the first battlefield role of care.
Intubation and providing mechanical ventilation are not without risk. The benefits should outweigh the attributable cost and risk of managing the mechanically ventilated patient, especially within the austere/ battlefield setting. Pathology associated with failure to oxygenate and failure to ventilate will most often require definitive airway interventions and appropriate mechanical ventilator support. At times, it may only serve as a temporizing measure while seeking definitive critical care. Initiation of mechanical ventilation must be guided by clinical suspicion of underlying pathophysiology and clear criteria. A definitive airway is required for effective mechanical ventilation and these patients require sedation – both mechanical ventilation and sedation may make a hypotensive patient more hypotensive and could result in hemodynamic instability. Thoughtful consideration for the requirement of mechanical ventilation must occur. See the JTS Airway Management of Traumatic Injuries and Analgesia and Sedation Management during Prolonged Field Care CPG. In patients with hemorrhagic shock requiring intubation and mechanical ventilation, remember the general principle of “resuscitation before intubation.” Utilize airway adjuncts if the patient’s airway can be maintained adequately during initial resuscitation efforts with blood products. In an under-resuscitated patient, cardiac arrest can occur when induction and paralytic medications are given during rapid sequence intubation.
The intent of this CPG is to provide the non-critical care trained medical personnel with guidance on basic ventilator management. Expanded information on definitions, ventilator terms and modes can be found in Appendix A and B. In the prolonged care setting, telemedicine consultation should be used if possible. Additional JTS CPGs with ventilatory support considerations are Acute Respiratory Failure and Wartime Thoracic Injury.
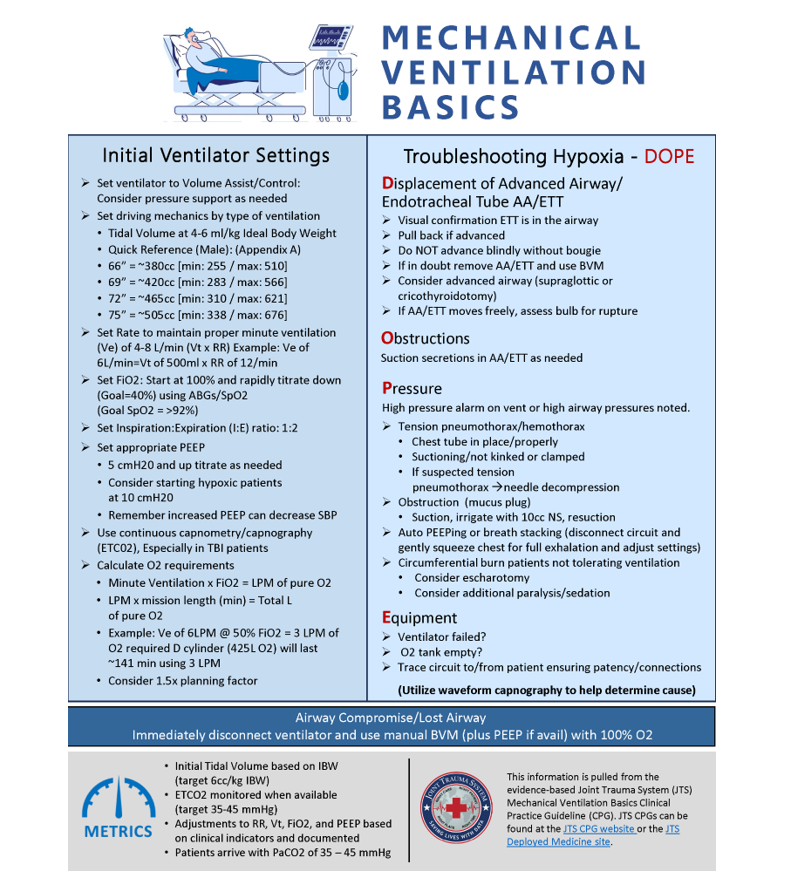
INITIAL VENTILATOR SETTINGS
*Prior to first use, ensure ventilator (as applicable) has been pre-set to utilize parameters of the user’s choice. Some ventilators may be preset to deliver an inspiration time (I-Time) instead of an I:E ratio. Some ventilators default to Volume or Pressure, which would need to be checked prior to use. Failure to appropriately set up and save these ventilator settings may delay use of the ventilator.
1. MODE: Assist Control (AC) or Adaptive Support Ventilation (ASV) -Hamilton-T1 only
Ensure the setting is either Volume or Pressure support. Some ventilators default to different settings.
2. Breaths Per Minute/Respiratory Rate: 14BPM (10-30 range)
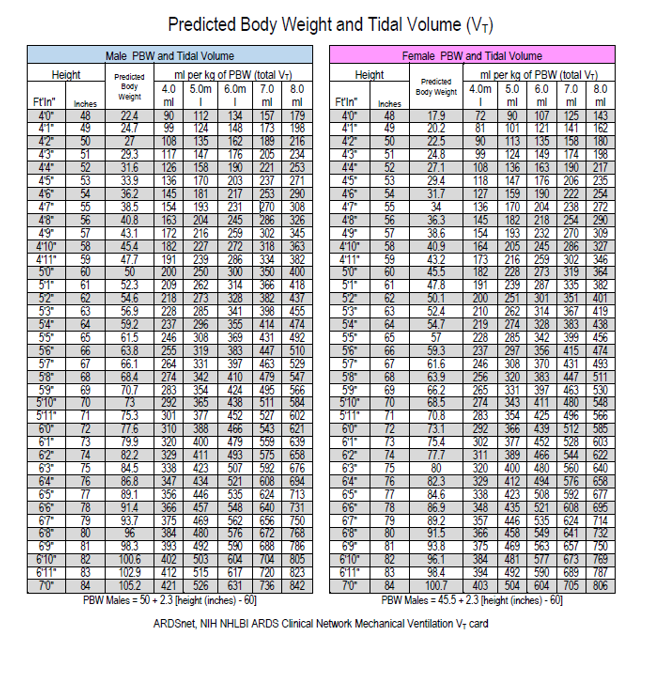
3. TIDAL VOLUME (VT): 6ml/kg IBW (4-8ml/kg IBW range)
Quick Reference: (Detailed reference in Appendix C)
Male
66” = ~380cc [min: 255 / max: 510]
69” = ~420cc [min: 283 / max: 566]
72” = ~465cc [min: 310 / max: 621]
75” = ~505cc [min: 338 / max: 676]
Female
60” = ~273cc [min: 182 / max: 364]
63” = ~314cc [min: 210 / max: 419]
66” = ~356cc [min: 237 / max: 474]
69” = ~397cc [min: 265 / max: 530]
4. Fraction of Inspired Oxygenation (FiO2): 21 - 100% (0.21-1.0) (low flow O2 @ 3 LPM (liters per minute) = ~ 40% FiO2 [flowrate on Saros oxygen concentrator])
5. Inspiratory-to-Expiratory (I:E) Ratio: 1:2
6. Positive End-Expiratory Pressure (PEEP): 5 [Range 5-20 cmH20]
7. Pressure Support: 5 [Range 5-20 cmH20] Consider adding if the patient has airway edema or is being ventilated through a narrower diameter ETT.
NOTE: Initial Ventilator settings are based on the patient's ideal body weight (IBW) and clinical condition. However, “basic” or standard starting points are necessary to begin treatment.
1. Set the ventilator to Volume Assist/Control. Consider pressure support if patient meets a clinical need.
2. Set driving mechanics by type of ventilation. Tidal Volume at 4-6 mL/kg IBW (Average adult male is 500 mL).
3. Set rate to maintain an appropriate minute ventilation (VE) of 4-8 L/min (VT x Rate = VE).
- For a MV of 6L and a VT of 500, set the rate at 12.
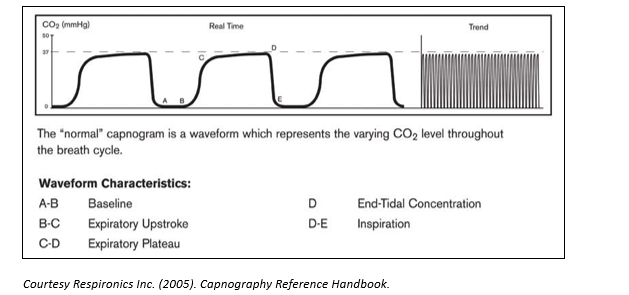
- Continuous capnometry or capnography is the standard for invasive airway management and should be used to monitor ventilations and as a tool to increase or decrease frequency. EtCO2 is especially important for monitoring TBI cases.
- It is advisable to set the respiratory rate close to what the intrinsic rate was prior to sedation and or paralysis as that rate was likely compensating for some metabolic derangement and just reflexively setting it to a “normal rate” might precipitate worsening acidosis.
4. Set appropriate PEEP. Minimum of 5 cmH2O. Start there and titrate up as needed. In hypoxic patients, consider starting at 10 cmH2O but take extreme caution if also hypotensive as PEEP may worsen BP.
5. Set Fi02. Depending on clinical condition the patient may need high Fi02. Start at 100% and rapidly titrate down to 40% using arterial blood gas and SpO2 data. Do not rely on Sp02 alone (if possible).1
6. Set Inspiratory: Expiratory Ratio (I:E) to 1:2 for most patients. Adjust to clinical conditions.
7. Oxygen requirements can be roughly calculated using Minute Ventilation x FiO2 fraction to determine LPM of pure O2 required (e.g., VE of 6 LPM @ 50% FiO2 (0.5) = 3 LPM bottled or generated O2 required.)
NOTE: Full D cylinder is ~425 liters O2 at 2200psi (i.e. ~141minutes O2 @ 3 LPM requirement above). Calculations should account for discrepancies in tank fill, leaks, dead space, etc. (consider a planning factor of 1.5-2 X calculated requirement).
It is important to test ventilator settings prior to attaching to the patient. A recommendation is to have a test training lung with the equipment. An XL exam glove taped to the circuit is a field expedient test lung. This can ensure the ventilator is appropriately performing.
ASSESSMENT AND THE INITIATION OF MECHANICAL VENTILATION
Determining the need for mechanical ventilation is critical for the effective application of a mechanical ventilation device. Mechanical ventilation has risks, especially in a prehospital environment without diagnostic tools such as CXR or ABG. Clinical acumen is vital to adequately predict a patient who will progress to respiratory compromise. Respiratory compromise requiring ventilator support can be identified early in M-massive hemorrhage, A-airway, R-respiratory, C-circulation, and H-hypothermia (MARCH) assessment.
Inability to adequately oxygenate, ventilate, or guard the airway are indications for mechanical ventilatory support – but the cause must be determined. Indications for intubation must be thoroughly considered as intubation and Positive Pressure Ventilation (PPV) have risks. For example, a patient with increased work of breathing due to hypoxia from pneumothorax will be severely harmed by intubation with the introduction of positive pressure that can expand the pneumothorax and result in lethal tension physiology. Additionally, the bleeding patient who has a very high respiratory rate due to global tissue hypoxemia from hemorrhagic shock may have a full cardiovascular collapse with administration of induction intubation medications and positive pressure ventilation. Thus, it is of utmost importance to ensure that intubation and Mechanical Ventilation (MV) are necessary and critical, with a plan for treating the most likely underlying etiology in place.
NOTE: Apneic patients with adequate circulation and an open airway require immediate assisted ventilation (i.e. bag valve mask [BVM]).
Though ABGs are the standard for managing patients with respiratory compromise, they are not often readily available in the operational environment. Utilization of pulse oximetry (SpO2) and capnography/capnometry (EtCO2) can provide a rapid assessment of a patient’s respiratory status (devices to achieve both are readily available in medical logistics systems).
SpO2 values < 90% are indicative of potential oxygenation issues; however, values can be unreliable due to poor perfusion and altitude.
EtCO2 values >45mmHg are indicative of hypoventilation, especially in the absence of tachypnea. Values <35mmHg indicate hyperventilation. It should be determined why the patient is tachypneic and the underlying cause treated. Mental preparation for mechanical respiratory support should be considered, but hypovolemia/hemorrhage must be treated first. Of note, EtCO2 may not perfectly reflect the arterial CO2 value in patients with significant lung injury and impaired gas exchange.2
A high index of suspicion for sepsis or another cause of metabolic acidosis should be considered in patients with low EtCO2 and hyperventilation.
The inability for a casualty to maintain appropriate SpO2 or EtCO2 values through less invasive measures (airway adjuncts, supplemental O2, etc.) indicates the need for escalating support. For locations with point of care blood analyzers, inadequate blood gas values also indicate the need for respiratory support. Hemorrhagic shock will result in tachypnea and a low EtCO2 . Intubation and mechanical ventilation prior to adequate blood resuscitation will result in circulatory collapse. It is critical to determine why the patient is tachypneic prior to intubation. Ruling out and treating both hemorrhage and tension pneumothorax (PTX) must occur before intubation. Additionally, a simple PTX which could result in moderate tachypnea, positive pressure ventilation can rapidly convert a simple PTX into a tension PTX which is immediately life threatening.
WARNING: Prior to the application of mechanical ventilation and/or initiation of invasive airway devices (e.g., Endotracheal Tube (ETT), extraglottic airways), patients must receive adequate sedation (and paralysis as appropriate/required). Never paralyze a patient who has not received sedation (in the prehospital environment, Ketamine should be first line for sedation) Detailed guidelines for the initiation and maintenance of this sedation can be found in the JTS Analgesia and Sedation Management during Prolonged Field Care CPG.
If respiratory insufficiency amenable to respiratory support is identified during the assessment, the initiation of timely mechanical ventilation can improve casualty outcomes. This can be as simple as BVM support or as complex as a critical care transport ventilator (e.g. Hamilton-T1 or Zoll EMV+), See Appendix D: Impact 754, Appendix E: Zoll EMV+ (731 Series), Appendix F: Hamilton-T1, Appendix G: Save II, Appendix H: Ventway Sparrow. 3,4
All casualties requiring advanced airway management should have a Heat and Moisture Exchanger (HME) attached to the BVM or the circuit tubing. This aids in humidification, heat conservation, reduced infection risk, and comfort/compliance. If used with an EtCO2 cap or device, the HME should be placed above the EtCO2 cap/device to enable more accurate EtCO2 measurements.
CAUTION: BVM respiratory support should be utilized as a temporary measure until mechanical ventilators can be applied. BVMs deliver irregular tidal volume (VT) and respiratory rates.
Although PEEP is helpful in maximizing alveoli recruitment it can also contribute to worsening hypotension in hypovolemic patients and concomitant aggressive resuscitation.
NOTE: Many patients may require increased sedation (and paralysis) for effective ventilation. Patients who are not properly sedated may cause issues with high pressure alarms as they breathe over the ventilator increasing their minute volume and intrathoracic pressures.
Gastric decompression is also a necessary step after securing the definitive airway and initiation of mechanical ventilation.
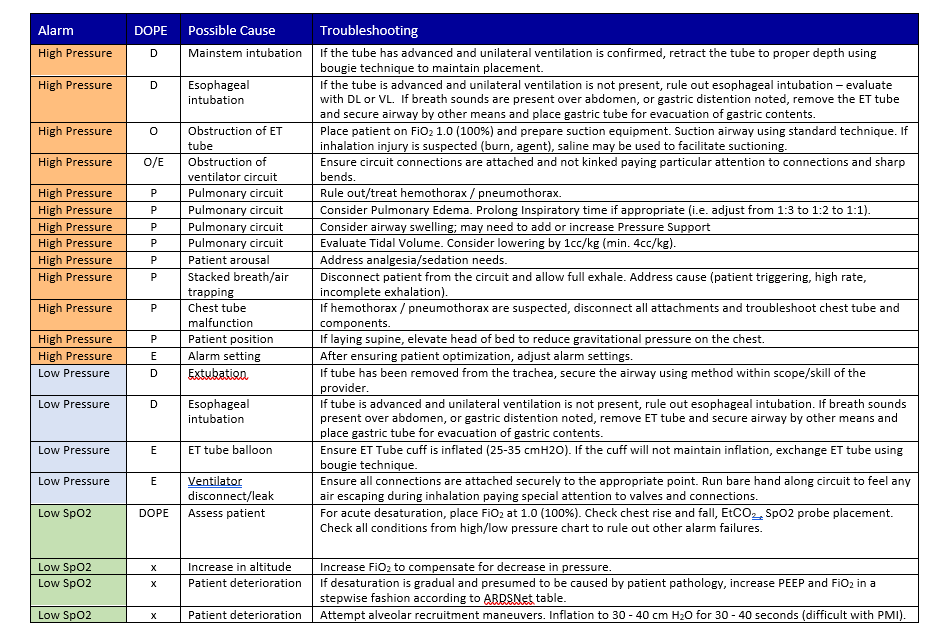
TROUBLESHOOTING
AIRWAY COMPROMISE OR LOST AIRWAY
If at any time the patient begins to de-saturate or develop respiratory problems, immediately disconnect the ventilator, and manually ventilate the patient with BVM (with PEEP valve if available) and 100% O2 while correcting issues utilizing the following D.O.P.E. algorithm.1
- Displacement: Verify that ETT is in place, patient not extubated/tube did not move during transfer.
- Check depth of the ETT by evaluating the numbers on the ETT. To confirm it is in the trachea, you must directly visualize the ETT’s position using direct or video laryngoscopy. If the ETT has advanced – pull back to original length and attempt to bag; if tube has pulled farther out of trachea, DO NOT ATTEMPT TO ADVANCE the ETT without laryngoscopy or placement of bougie to verify tracheal placement. When advancing the bougie, feel for tracheal rings or stop/ resistance at the carina. If in doubt, remove the endotracheal tube and attempt BVM. If air movement is adequate, continue to bag ventilate the patient. Upon stabilization, consider alternative advanced airways (supraglottic airway or cricothyroidotomy).**If ETT moves freely, access for ETT bulb rupture via cuff manometer.5
- Obstructions: Assess for secretions in ETT. Suction if indicated.
- Pressure: Ensure that a tension pneumothorax / hemothorax has not developed (if the chest tube is in place, ensure it is properly suctioning, not kinked or clamped). If tension pneumothorax / hemothorax is suspected, perform immediate needle thoracentesis. Auto PEEPing or breath stacking can mirror development of a tension pneumothorax (disconnect circuit and gently squeeze chest for full exhalation and adjust settings see below for further description). Assess the need for escharotomy if circumferentially burned. Consider additional paralysis and sedation if patient does not tolerate ventilation.5,6
- Equipment: Ensure that ventilator did not fail; O2 tank not empty. If ventilator is operational, trace all tubes to the patient connection (airway tube, transducer line, exhalation line) ensuring patency and connections.1
- Waveform Capnography: The utilization of concurrent waveform capnography may assist in determining the causative issue while working the D.O.P.E mnemonic.
High pressure alarms/Peak airway pressure alarms (Peak pressure >35 cm H2O): Correct problems causing increased airway resistance and decreased lung compliance, including pneumothorax or pulmonary edema. Check the ventilator to ensure the prescribed tidal volume is being delivered. Check for linked/crushed tubing.
Air leaks causing low pressure alarms/volume loss: ETT cuff malfunction/rupture is most commonly identified through loss of VT or audible leak. Assess, correct air leaks in endotracheal tube, tracheostomy cuff, ventilator system; recheck ventilator to make sure prescribed tidal volume is delivered.3
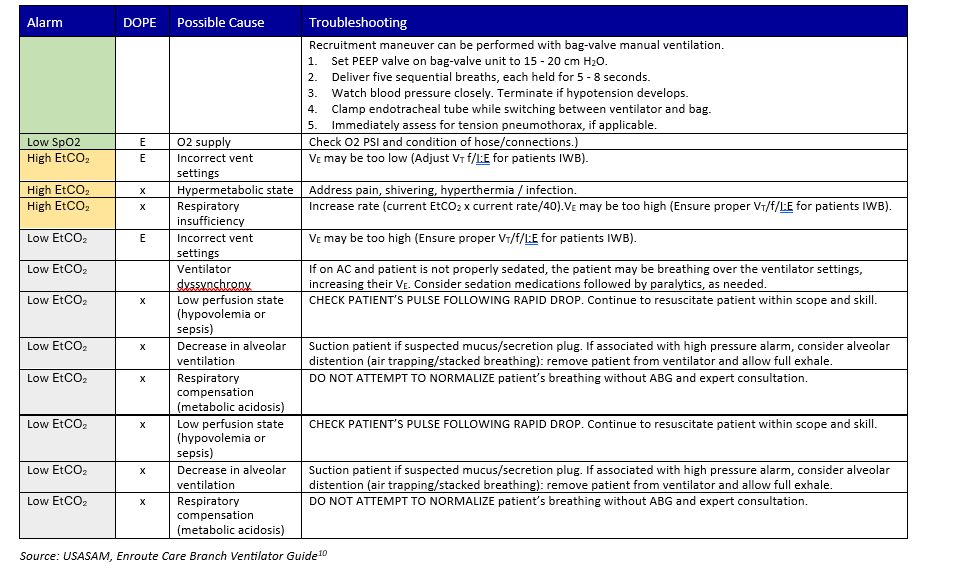
VENTILATOR DYSSYNCHRONY
Ventilator dyssynchrony is a clinical entity in which ventilator gas delivery and patient respiratory mechanics are not matched. Agitation and respiratory distress that develop in a patient on a mechanical ventilator who has previously appeared comfortable represents an important clinical circumstance that requires a thorough assessment and an organized approach. The patient should not always be automatically re-sedated but must instead be evaluated for several potentially life-threatening developments that can present in this fashion.7
Lung hyperinflation (air trapping) and auto-PEEP: Dynamic hyperinflation is associated with positive end-expiratory alveolar pressure, or auto-PEEP. The physiologic effects of air trapping include decreased cardiac preload because of diminished venous return into the chest. This can lead to hypotension and, if severe, to pulseless electrical activity and cardiac arrest. Dynamic hyperinflation can also lead to local alveolar over-distention and rupture. Prevent and manage lung hyperinflation by decreasing tidal volume, changing inspiratory and expiratory phase parameters, switching to another mode, and correcting physiological abnormalities that increase airway resistance.8,9 In an emergency, auto-PEEP from air trapping can be relieved by simply disconnecting the circuit from the endotracheal tube for 3-5 seconds, and then reconnecting.
CHANGES IN RESPIRATORY STATUS
1. Assess patient’s prior interventions.
2. Assess the following patient’s respiratory status:
- Rate
- Rhythm
- Depth
- Effort
3. Assess monitors:
- Oxygenation (SpO2)
- EtCO2 (with advanced airway or EMMA mounted on non-rebreather mask)
- Cardiac monitoring if available
4. Determine cause of ventilation issue and/or ventilator alarm using DOPE mnemonic.
Recently published USAF EMS protocols
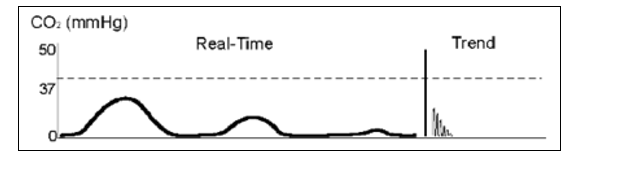
Possible causes:
- Missed intubation
- A normal capnogram is the best evidence that the ET tube is correctly positioned.
- With ET tube in the esophagus, little or no CO2 is present.
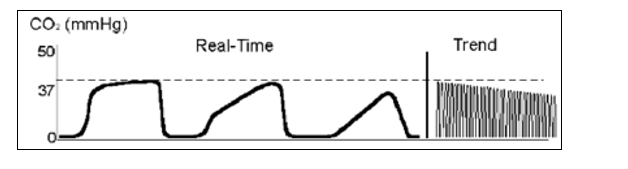
Possible causes:
- Partially kinked or occluded artificial airway
- Presence of foreign body in the airway
- Obstruction in expiratory limb of breathing circuit
- Bronchospasm
Source: https://openairway.org/capnography
PERFORMANCE IMPROVEMENT (PI) MONITORING
All patients with an advanced airway requiring mechanical ventilation during transport.
- Initial tidal volume is based on ideal body weight, targeting 6cc/kg.
- EtCO2 is monitored, targeting a range between 35-45 mmHg.
- Adjustments to respiratory rate, tidal volume, FiO2, and PEEP are based on clinical indicators (i.e. oxygen saturation, peak airway pressure, EtCO2) and documented on the DD 3104
- All patients in the population of interest arrive with PaCO2 35-45mmHg.
PERFORMANCE/ADHERENCE MEASURES
Number and percentage of patients with an advanced airway that arrive with initial PaCO2 35-45mmHg.
- Patient Record
- Department of Defense Trauma Registry (DoDTR)
The above constitutes the minimum criteria for PI monitoring of this CPG. System reporting will be performed annually; additional PI monitoring and system reporting may be performed as needed.
The system review and data analysis will be performed by the JTS Chief and the JTS PI Branch.
It is the trauma team leader’s responsibility to ensure familiarity, appropriate compliance, and PI monitoring at the local level with this CPG.
REFERENCES
- Wilcox SR, Saia MS, Waden H, et al. Mechanical ventilation in critical care transport. Air Medical Journal, 2016. 35(3), 161-165.
- Enomoto T, Inoue Y, Adachi Y, Kouno S, Inagaki Y, Azuma K, Katayama K, Takeuchi N, Matsuda Y. Limitations of End-Tidal CO2 Measured with a Portable Capnometer to Estimate PaCO2 for Patients with Respiratory Disease. Turk Thorac J. 2021 May;22(3):212-216.
- Delorenzo AJ, Shepherd M, Jennings PA. Endotracheal cuff pressure changes during helicopter transport: a systematic review. Air Medical Journal, 2017. 36(2), 81-84.
- Fundamental Critical Care Support. 6th ED. Society of Critical Care Medicine. 2017
- Delorenzo AJ, Shepherd M, Jennings PA. Endotracheal cuff pressure changes during helicopter transport: a systematic review. Air Medical Journal, 2017. 36(2), 81-84.
- Shah AA, Kettle PB, Niven AS. Ventilator management: a practical approach to respiratory failure in combat casualties. In Front Line Surgery, 2017. 631-646.
- Hamilton Medical. (2015). HAMILTON-T1 Quick Guide [Pamphlet]. Reno, NV. 2015.
- Acosta P, Santisbon E, Varon J. The use of positive end-expiratory pressure in mechanical ventilation. Critical Care Clin, Apr 23, 2007 (2), 251-61.
- Pierson, D. J. (2008). A primer on mechanical ventilation.
- S. Army MEDEVAC Critical Care Flight Paramedic Standard Medical Operating Guidelines (SMOG), 2021.
APPENDIX A: DEFINITIONS AND VENTILATOR TERMS
MECHANICS/PHYSIOLOGY OF BREATHING
- Respiratory drive: The normal respiratory rate is 12-20 bpm. Respiratory drive is controlled by central and peripheral receptors based on arterial concentrations of carbon dioxide (CO2); oxygen (O2), and hydrogen ions. Increased intracranial pressure, administration of opioids and other medications may cause a central decrease in respiratory drive. This could result in insufficient ventilation to maintain an adequate level of oxygenation and clearance of CO2.1-3
- Work of breathing: Work of breathing is the mechanical work needed to maintain oxygenation and ventilation. Pain, acidosis, and hypermetabolic states will cause an increased work of breathing. This is not necessarily pathologic but does indicate additional respiratory support is needed while working up the underlying etiology. Prolonged tachypnea, with etiology undiagnosed and untreated, can lead to inspiratory muscle fatigue which could require mechanical ventilator support (e.g., hemorrhagic shock, severe rib fractures, untreated asthma, etc.) 1-3
- Lung compliance: Lung compliance is the ability of the lung to expand when given a certain amount of air pressure. The more compliant the lung, the less pressure needed for it to expand to a certain volume. Lungs with low compliance will require higher pressures to expand to the same volume as a normal lung. Internal causes such as pneumothorax and fluid/blood in the alveoli can decrease lung compliance. There are also external causes that decrease lung’s ability to expand due to the stiffness of the chest wall, such as obesity, pregnancy, burns, chest wall injury.1-5 A decrease in lung compliance from any cause can lead to hypoxemia and hypercapnia.
- Tidal volume (TV or VT): Is the volume of air that is exchanged in one breath. Decreases in tidal volume can result from external pressure (i.e. Pneumothorax, hemothorax, tension pneumothorax) by effectively reducing lung volume. Dynamic hyperinflation also known as “breath stacking” is caused by the inability to completely exhale and can lead to “auto-positive end expiratory pressure (auto-PEEP).” This may be due to inadequate exhalation time, airflow obstruction, or both. This condition leads to decreasing tidal volumes and can cause hemodynamic compromise.1-3
- Oxygenation: The successful binding of oxygen to hemoglobin at the cellular level in the alveoli, drives SaO2 (arterial oxygen saturation) and SpO2 (oxygen saturation) values. Successful alveolar gas exchange enables efficient aerobic respiration at the cellular level in all perfused body tissues. 1-3
- Diffusion/exchange: The process where oxygen (O2) is exchanged with CO2 on red blood cells in the alveoli/pulmonary capillaries for transport to body tissues. Pathologic conditions such as pulmonary edema, pneumonia, and acute respiratory distress syndrome (ARDS) can impair diffusion of oxygen across the alveolar membrane leading to reduced oxygen saturation of hemoglobin. 1-3
- Fraction of Inspired Oxygen (FiO2): Normal atmospheric air contains 21% oxygen or an FiO2 of 0.21. By increasing the percentage of oxygen delivered to the patient (supplemental oxygen), you can potentially increase the arterial oxygen saturation and oxygen content of the bloodstream. 1-3
- Dead Space: Any part of the airway where gas exchange does not occur, pharynx, larynx, trachea, bronchi, and ventilator tubing are examples.
- Hypoxia: A state of O2 deficiency in the tissue significant enough to cause impairment of function. Causes can be multifactorial to include low PaO2 due to elevation/altitude(>10,000 feet), decreased available RBCs such as hemorrhage or decreased RBC functionality such as CO poisoning, inadequate circulation or perfusion such as G force pooling or hypotension causes without RBC deficits, and decreased tissue level oxygen transport such as in cyanide poisoning. 1-3
VENTILATION DEFINITIONS
- Minute ventilation (VE): Tidal volume multiplied by the respiratory rate (normal is 60cc/kg/min), usually expressed in liters (8-10L.min). The body regulates carbon dioxide through changes in minute ventilation. Increases in carbon dioxide leads to increased respiratory rate and/or tidal volume and increased minute ventilation (amount of air exchanged during one minute of ventilation). 1-3
- Peak Inspiratory Pressure (PIP): The greatest pressure within the lungs during inspiration. Pressures above 35mmHg have been shown to cause pressure-related lung injury (barotrauma). Ideally, pressures should remain below 30 mmHg. Increased peak pressures are usually due to increases in resistance or decreased lung compliance within the respiratory system (e.g., kink in the circuit, mucous plugging, laryngospasm/bronchospasm, tension pneumothorax, inability for adequate exhalation, edema). 1-3
- Plateau pressure: It is the static pressure achieved at the end of a full inspiration. To measure plateau pressure, we need to perform an inspiratory hold on the ventilator to permit the pressure to equalize through the system. Plateau pressure is a measure of alveolar pressure and lung compliance. Normal plateau pressure is below 30 cm H20, and higher pressure can generate barotrauma. Checking a plateau pressure is helpful to delineate between a resistance or compliance problem. If peak pressures are high and plateau pressures are normal, this is indicative of a resistance problem (kinked circuit, ventilator asynchrony, laryngospasm, mucous plugging, etc.). If peak and plateau pressure are high, this is more likely from compliance issues such as pneumonia, pulmonary edema, atelectasis, pneumothorax, abdominal compartment syndrome, etc.).
- End Tidal CO2 (EtCO2 ): Measurement of carbon dioxide on end tidal expiration. Normal values are 35mmHg-45mmHg. Exhaled gasses are analyzed by either vital signs monitor or portable EtCO2 devices (e.g., EMMA) a quantitative capnograph or capnometer is the clinical standard of care with invasively ventilated patients. EtCO2 is one of the most useful measures to determine overall adequacy of ventilation. Anyone who is intubating a patient and putting them on mechanical ventilation must be able to monitor EtCO2 .
- Arterial Blood Gas (ABG): Although continuous pulse oximetry and EtCO2 can reliably confirm adequate oxygenation, ventilation, and guide most ventilator changes – ABGs are the gold standard for evaluating acid-base status, oxygenation, ventilation and adjusting ventilation settings. If a point of care blood gas analyzer is available, this can enable targeted ventilator setting changes. Knowing these values will greatly improve critical care guidance via telemedicine resources. At facility-based care (Role 2 care and beyond) an arterial line for continuous blood pressure monitoring and ABG sampling should be placed.
- Normal ABG values:
- pH (7.35-7.45)
- PaO2 (75-100 mmHg)
- PaCO2 (35-45 mmHg)
- HCO3 (22-26 meq/L)
- Base excess/deficit (-2 to +2)
- SaO2 (95-100%)
While in the PH and rotary wing transport environments, it is rare to obtain an ABG – knowing the normal values is important to check a patient prior to Role 2 to Role 3 RW transport. The ABG is extremely useful in trauma resuscitations because the pH, lactate and base deficit will give an overall picture of perfusion.
- pH: Measure of hydrogen ion concentration (i.e. acid-base status). Acidosis (low pH) leads to coagulopathic states in trauma patients as well as development of potentially fatal cardiac arrhythmias.
- PaO2: Measurement of dissolved oxygen in blood, also a measurement of adequacy of gas exchange at the cellular level.
- PaCO2: Measurement of dissolved carbon dioxide in blood, also a measurement of adequacy of gas exchange at the cellular level.
- HCO3: Measurement of bicarbonate in the blood, serves as a buffer against acid.
- Base excess: Gives indication of metabolic component of blood gas results, most likely will not change field ventilator management but can provide information for telemedicine consultation regarding adequacy of resuscitation.
- SaO2: Percentage of oxygen bound to hemoglobin in arterial blood, correlates closely with SpO2 values.
- Volume-targeted modes: Volume constant, inspiration terminates when preset VT delivered. Peak airway pressure is variable and increases as needed to deliver prescribed VT. This is generally represented by a constant flow waveform.
- Pressure-targeted modes: Volume variable and dependent on pulmonary compliance. The vent terminates flow of air when the pressure is met. Peak airway pressure is fixed, determined by set pressure level. This is generally represented by a decelerating flow waveform.
- Tidal volume (VT): Is the volume of gas, exchanged during a breath and commonly expressed in milliliters. VT is generally set between 4-8 ml/kg ideal body weight (IBW), to prevent lung over distension and barotrauma.
- Frequency (f): Is the rate, per minute, of breathing (patient or ventilator). Known as respiratory rate (RR).
- Minute Ventilation (Ve): Is the average volume of gas entering, or leaving, the lungs per minute, commonly expressed in liters per minute. The product of VT and RR (respiratory rate). Normal Ve is 5 – 10 L/min.
- Inspiratory (I) and Expiratory (E) time and I:E ratio: Is the period of time over which the VT is delivered. Setting a shorter inspiratory time (I) results in a faster inspiratory flow rate in volume cycled ventilation. Average adult inspiratory time is 0.7 to 1 second. I:E ratio is usually 1:2.
- Positive end-expiratory pressure (PEEP): Is the amount of positive pressure that is maintained at end-expiration. It is expressed in centimeters of water (cmH2O). The purpose of PEEP is to increase end-expiratory lung volume and reduce air-space closure at end-expiration. Normal physiologic PEEP is 5 cmH2O.
- Pressure Support (PS): Delivers flow at a set pressure, generally to overcome resistance of the airway and ventilator circuit. PS can also be used to support a spontaneously breathing patient, such as with Bi-PAP.
- Flow: Is the velocity at which gas is delivered to the patient, expressed in liters per minute. When the flow rate is set higher, the speed of gas delivery is faster and inspiratory time is shorter.
- Peak Inspiratory Pressure (PIP): Represents the total pressure that is required to deliver the VT and depends upon various airway resistance, lung compliance, and chest wall factors. It is expressed in centimeters of water (cmH2O).
- Sensitivity or trigger sensitivity: Effort, or negative pressure, required by the patient to trigger a machine breath, commonly set so that minimal effort (-1 to -2 cmH2O) is required to trigger a breath.1,3
- Grossbach I, Chlan L., Tracy MF. Overview of mechanical ventilatory support and management of patient-and ventilator-related responses. Critical care nurse, 2011. 31(3), 30-44.
- The National Heart, Lung, and Blood Institute. How the Lungs Work Video. Nov 10, 2020 https://www.youtube.com/watch?v=C0mYCssvYpE
- Wilcox SR, Richards JB, Fisher DF, et al. Initial mechanical ventilator settings and lung protective ventilation in the ED. The American journal of emergency medicine, 2016. 34(8), 1446-1451.
APPENDIX B: VENTILATOR MODES AND SETTINGS
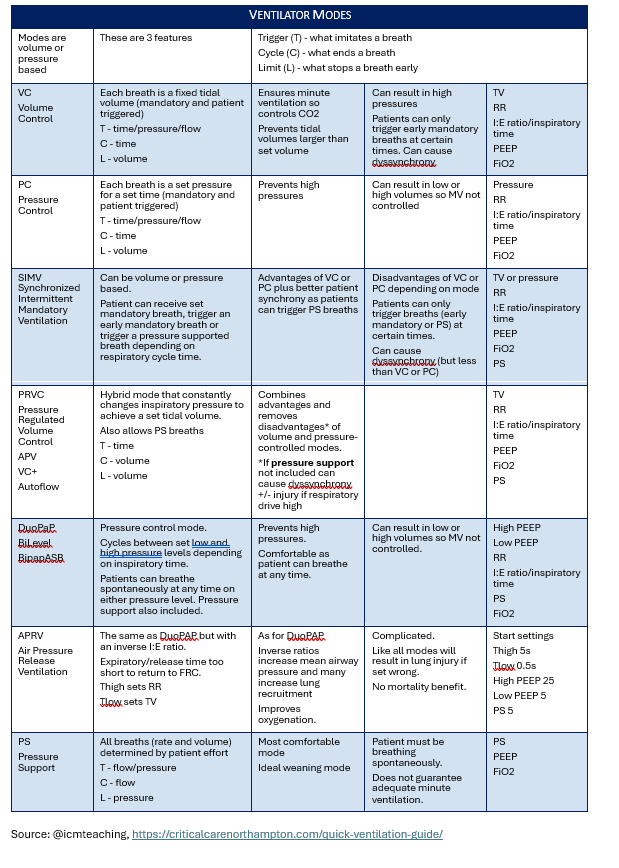
Volume-targeted Modes
- Volume Assist/Control (V-AC), Assist Control (AC) or Volume Control Ventilation (VCV): Delivers a preset number of mandatory breaths per minute (control part). The patient can take their own breaths in addition to mandatory breaths, with each spontaneous breath receiving the full preset tidal volume (assist part). Airway pressures can vary during delivery. 1-3
- Volume Synchronized Intermittent Mandatory Ventilation (V-SIMV) combines mandatory breaths and supported breaths. “synchronized” means it will adjust the delivery of breaths with the patient’s effort. “Intermittent” means that not all breaths are supported. The ventilator delivers a preset number of mandatory breaths per minute. Any breath taken over the set RR will not receive the set tidal volume and is solely based on the patient’s lung compliance and effort. Newer models offer PS with patient triggered breaths.
Pressure-targeted Modes
- Pressure Support Ventilation (PSV) supports every patient breath with a preset amount of pressure support. No mandatory breaths are given, so the patient must be spontaneously breathing.
- Pressure Assist control (P-AC), or Pressure Control Ventilation (PCV) delivers a set number of mandatory pressure-controlled breaths, in which the patient receives a fixed pressure during a preset inspiratory time. Any breaths over the set rate will be pressure controlled with the same amount of pressure. The delivered tidal volume will be based on the amount of pressure applied, the lung compliance and airway resistance of the patient.
Adaptive Support Ventilation (ASV)
ASV provides intelligent ventilation mode that continuously adjusts respiratory rate, tidal volume, and inspiratory time depending on the patient’s lung mechanics and effort. This is similar to “Auto-Flow” or other like settings on different brands of ventilators. Currently only available on the Hamilton-T1.
Continuous Positive Airway Pressure (CPAP)
CPAP Is a type of positive airway pressure, where the air flow is introduced into the airways to maintain a continuous pressure to constantly stent the airways open, in people who are breathing spontaneously.1 CPAP provides constant pressure above that of the atmospheric pressure. Delivered via the upper respiratory tract.
Pressure Regulated Volume Control (PRVC) Ventilation
PRVC ventilation is designed for invasive mechanical ventilation and combines volume and pressure strategies. PRVC delivers a pressure-controlled and tidal volume (VT)–targeted breath using a decelerating flow waveform pattern that allows unrestricted spontaneous breathing with or without pressure support (PS). 2 (may be Impact 731 only). ***
BL (bilevel)
The BL ventilator provides two pressure settings to assist patients breathing spontaneously: a higher inhalation pressure (IPAP) and a lower exhalation pressure (EPAP).NOTE: This feature is only available on the Zoll. ***
***See Acute Respiratory Failure CPG for more detail on advanced ventilator modes/settings.
VENTILATOR ADJUSTABLE SETTINGS
Tidal volume (VT )
The volume of gas, exchanged during a breath and commonly expressed in milliliters. VT is generally set between 4-8ml/kg IBW, to prevent lung over distension and barotrauma.4-8
Ideal IBW
The weight at which tidal volume is calculated against instead of using actual weight. This enables patients to be ventilated in a lung-protective strategy. A quick reference chart can be found in Appendix C. IBW can be calculated manually as follows:
- Male: {(Height in inches-60) x 2.2} +50 (e.g. 72in-60= 12; 12 x 2.2 = 26.4; 26.4 + 50 = IBW of 76.4 kg)
- Female: {(Height in inches-60) x 2.2} +45 (e.g. 65in-60= 5; 5 x 2.2 = 11; 11 + 45 = IBW of 56 kg)
Minute Ventilation (VE)
The average volume of gas entering, or leaving, the lungs per minute, commonly expressed in liters per minute. Also called minute volume. Minute ventilation is the product of VT and RR (respiratory rate). Normal VE is 5 – 10 L/min. 4-8
I:E Ratio
See I:E definition. I:E might need to be adjusted for physiology that requires extended exhalation time. 4-8 For example: Asthma patient may require an I:E of 1:3, 1:4, or 1:5 to allow for more exhalation time.
Flow Rate
Is the velocity at which gas is delivered to the patient, expressed in liters per minute. When the flow rate is set higher, the speed of gas delivery is faster and inspiratory time is shorter. 4-8
Peak Inspiratory Pressure (PIP)
Represents the total pressure that is required to deliver the VT and depends upon various airway resistance, lung compliance, and chest wall factors. It is expressed in centimeters of water (cm H2O).
Sensitivity or trigger sensitivity
Trigger sensitivity Is the effort, or negative pressure, required by the patient to trigger a machine breath, commonly set so that minimal effort (-1 to -2 cm H2O) triggers a breath.1,3 This is usually seen with assist modes of ventilator operation.
Pressure alarms
Pressure alarms ensure that providers are alerted to pressures that fall outside of appropriate ranges and have potential to harm the patient via barotrauma (over-pressure) or under-ventilation (circuit disconnect or under-pressure). Pressures will be determined by placing the patient on the vent for ~1-2 minutes and determining intrinsic peak inspiratory pressure. (Labeled as PEAK on 754 Ventilator (top right); Labeled as peak on Hamilton T1 ventilator (top left); Labeled as PIP on ZOLL EMV+ (731) (right center). Standard alarm settings should be: Need to measure a peak pressure 5 min after setting initial settings.
- High pressure alarm: 10 cmH2O above peak airway pressure.
- Low pressure alarm: 5 cmH2O below peak airway pressure.
- Grossbach I, Chlan L., Tracy MF. Overview of mechanical ventilatory support and management of patient-and ventilator-related responses. Critical care nurse, 2011. 31(3), 30-44.
- The National Heart, Lung, and Blood Institute. How the Lungs Work Video. Nov 10, 2020 https://www.youtube.com/watch?v=C0mYCssvYpE
- Wilcox SR, Richards JB, Fisher DF, et al. Initial mechanical ventilator settings and lung protective ventilation in the ED. The American journal of emergency medicine, 2016. 34(8), 1446-1451.
- Mora Carpio AL, Mora JI. Ventilator Management. [Updated 2023 Mar 27]. In: StatPearls [Internet]. Treasure Island (FL): StatPearls Publishing; 2023 Jan-.
- Maddry JK, Ng PC, et al. Impact of prehospital airway management on combat mortality. The American journal of emergency medicine, 2018. 36(6), 1032-1035.
- Shah AA, Kettle PB, Niven AS. Ventilator management: a practical approach to respiratory failure in combat casualties. In Front Line Surgery, 2017. 631-646.
- Wilcox SR, Saia MS, Waden H, et al. Mechanical ventilation in critical care transport. Air Medical Journal, 2016. 35(3), 161-165.
- Hollott J, Stokoe A, Vallance S, et al. Advanced ventilation and monitoring during helicopter hoist extraction of an intubated patient. Air Medical Journal, Nov 2020. 39(6), 512-515.
APPENDIX C: PREDICTED BODY WEIGHT AND TIDAL VOLUME
APPENDIX D: IMPACT 754

The source document is at https://archive.org/details/manual_Impact_Uni-Vent_754_Operation_and_Service_Manual
RULE OF 5S (KEEP IT SIMPLE VENT SETTINGS FOR ADULTS)
There are five numbered dials on the front of the Eagle/Impact Vent. Most settings can be set by remembering multiples of five. Do not hook up casualty to the breathing circuit until after the PEEP is set.
- Dial 1 — Turn on to calibrate. You must calibrate the vent every time you turn it on. Turn the knob to the right. The LED display will show "Cal-Mode" and then "Cal-OK;" turn the knob to the left past Continuous Positive Airway Pressure (CPAP) and to Synchronized Intermittent Mandatory Ventilation (SIMV) or Assist Control.
- Dial 2 — Ventilatory Rate — set at 10.
- Dial 3 — I:E ratio of 1:2. Turn the knob all of the way to the left. This setting is generally satisfactory for all adults and pediatrics with trauma related requirements for mechanical ventilation. Medical problems like chronic obstructive pulmonary disease and asthma may require longer ratios, and this should be assessed after the initial settings have been set.
- Dial 4 — Tidal Volume of 500 ml and adjust as needed. Tidal volume calculation is 4-8 ml/kg, therefore 6 ml/kg is recommended after the initial setting of 500.
- Dial 5 — Air/oxygen mixer. For room air the knob will be all of the way to the left and for 100% 02 will be all of the way to the right.
IMPACT 754 VENTILATOR PRE-MISSION CHECKS AND TROUBLESHOOTING
Routine Care
- Clean the unit and hose attachments with damp soapy cloth and wipe dry.
- Remove the inlet filter to check for dirt or debris.
- Check metal hose couplings for thread wear and debris.
Duty Inspection
1. Power Off Checks:
a. Verify inspection is within the calibration date (6-month maintenance cycle).
b. Check the air inlet is clear of obstructions and the filter is in place (Right side of vent).
c. Verify the Gas (“OXYGEN IN” and “AIR IN”) and Patient (“EXHALATION VALVE” and “TRANSDUCER”) connections are clear and tight (Top of ventilator).
d. Verify the “GAS OUT” clear leaf valve is installed and seated (reseat if loose, replace if missing).
e. Inspect green high pressure oxygen hose for cracks, dry rot, threads, black O-ring (replace if damaged).
f. Connect the ventilator to a high pressure oxygen source, turn on the oxygen tank and ensure no leaks are present.
g. Turn off O2 when complete (conduct in environment conducive to hearing leaks).
2. Power On Checks
a. Turn “MODE” (knob 1) to desired setting (AC, SIMV, CPAP). The ventilator will run a SELF-TEST upon set up (ventilator circuit should be disconnected). At this point, (CAL) is not required. If SELF-TEST results in a Calibration Failure, place (1) to CAL until CAL OK is displayed. If the calibration fails, the ventilator must be taken out of service.
b. Check BATT OK
c. Preset ventilator knobs to:
- Rate (knob 2) 14
- Inspiration Time (knob 3) 1:2
- TIDAL VOLUME: 6ml/kg IBW (4-8ml/kg IBW range)
- *QUICK REFERENCE (Male): (Detailed quick reference in Appendix A)
- 66” = ~380cc [min: 255 / max: 510]
- 69” = ~420cc [min: 283 / max: 566]
- 72” = ~465cc [min: 310 / max: 621]
- 75” = ~505cc [min: 338 / max: 676]
- FiO2 (knob 5) 100%
- Set HIGH pressure alarm to 35 cmH2O
- Set LOW pressure to 15 cmH2O
3. Turn OFF.
4.. Make sure the air inlet and gas out ports of the ventilator are protected and covered.
EMERGENCY PROCEDURES
These procedures should be practiced before being performed on live patients.
NOTE: Any known malfunction of the ventilator should be addressed prior to utilization. The following are not for routine use, but for emergencies when alternate ventilatory measures are not available and long term BVM is not practical.
*ALL CAUTIONS, WARNINGS, AND NOTIFICATIONS THAT CORRESPOND WITH THE 754 SCREEN WILL BE IN ALL CAPS*
- Inability to deliver high pressure O2 when needs exceed 21% FiO2 (i.e. missing/unserviceable green high pressure hose).
- Vent will alarm and show O2 Low/Fail-Check Oxygen Source/Connections on screen.
NOTE: First place the patient on BVM with supplemental oxygen. Second, check oxygen tank volume. Third, check the oxygen lines and connections.
Alternative Methods to Increase Delivered Oxygen Content
1. Oxygen reservoir kit for low pressure supply (Part # 820-0097-15).
2. Oxygen reservoir fashioned from primary circuit and BVM.
a. Connect short portion of main circuit tube to the BVM and to the air-inlet port.
b. Connect BVM oxygen hose to the BVM and regulator.
c. Set regulator to desired setting (~10LPM, but no lower than total minute volume).
3. Oxygen reservoir fashioned from second ventilator patient circuit.
a. Cut/disconnect exhalation valve off of second ventilator circuit.
b. Feed green transducer hose at least ¾ of the way down vent tubing (the goal is to get as close as possible to the air inlet port) and secure in place with tape (do not cover the end of the circuit).
c. Connect the 90 degree/”L” shape fitting of the green transducer line to the oxygen regulator.
d. Connect the opposite end of the vent tubing to the air inlet port.
e. Set regulator on oxygen source to 10 LPM to deliver up to 99% FIO2.
Missing or Damaged “Gas Out” Leaf Valve
Missing Gas Out leaf valve will trigger an alarm, give a DISCONNECT-CHECK CIRCUIT CONNECTIONS, no PEAK value will display, and little to no volume will be delivered to the patient.
- Place the patient on BVM with supplemental oxygen.
- Perform DOPE (Dislodgment, Obstruction, Pneumothorax, and Equipment) assessment.
- Check Gas Out clear plastic leaf valve for installation and proper seating.
- If the valve is folded, use a small object to gently unfold or push the valve back into place.
- If missing, cover exterior Gas Out side ports with occlusive dressing (replacing Gas Out leaf valve is optimal, but is time consuming.)
WARNING: Occluding “Gas Out” side ports will enable the ventilator to provide full respirations, however, this will eliminate the anti-asphyxia function these ports provide. (Ventilator failure will result in increased resistance in spontaneous respiration) and strict surveillance must be kept on ventilator to ensure any further failure is caught immediately. Patients must immediately be transitioned to BVM in the event of any failure.
Compressor Failure/Alarms (may show CODE 2).
- Place patient on BVM with supplemental O2.
- Cycle ventilator to OFF.
- Turn FiO2 (knob 5) to 100%.
- Cycle back on and to desired settings. MUST leave FiO2 at 100%. PEEP will have to be reset when the vent is cycled on.
NOTE: This technique will transition the ventilator to using oxygen pressure instead of the compressor to gather drive ventilation and may hasten oxygen usage.
Battery Failure
- Place patient on BVM with supplemental O2.
- Turn ventilator OFF.
- Replace ventilator battery with battery from 326M suction apparatus (per the manufacturer, they are the exact same). The 326M battery is in the same location as the 754.
- Resume normal operations. PEEP will have to be reset.
APPENDIX E: ZOLL EMV+ (731 SERIES)

1. Turn on the ventilator and ensure that the machine is functional and the battery is charged.
2. Attach the ventilator tubing and O2 tubing to the machine.
3. If the patient is a transfer on a vent, maintain ventilator settings from the medical treatment facility.
4. Default Adult Settings
a. MODE: AC (V)
b. BPM: 12
c. I:E 1:3
d. VT: 450
e. PEEP: 5
f. PIP limit: 25
g. FiO2: 21
5. If the patient is "newly" on the ventilator, initial settings should include:
a. MODE: AC
b. BPM/RRate: 14 BPM (10-30 range)
c. TIDAL VOLUME: 6ml/kg IBW (4-8ml/kg IBW range)
QUICK REFERENCE (Male): (Detailed quick reference in Appendix A)
66” = ~380cc [min: 255 / max: 510]
69” = ~420cc [min: 283 / max: 566]
72” = ~465cc [min: 310 / max: 621]
75” = ~505cc [min: 338 / max: 676]
d. FiO2 : 21 - 100% (0.21-1.0) (low flow O2 @ 3 LPM = ~ 40% FiO2 [flowrate on Saros oxygen concentrator])
e. I:E Ratio: 1:2
f. PEEP: 5 [Range 5-20]
6. Monitor waveform on the machine and visually inspect the patient to ensure no “breath stacking.” If this occurs, a high-pressure alarm may sound. However, if breath stacking is suspected even in the absence of alarm – disconnect tubing and allow exhalation and decrease the I:E if possible from 1:2 to 1:4.
APPENDIX F: HAMILTON T1
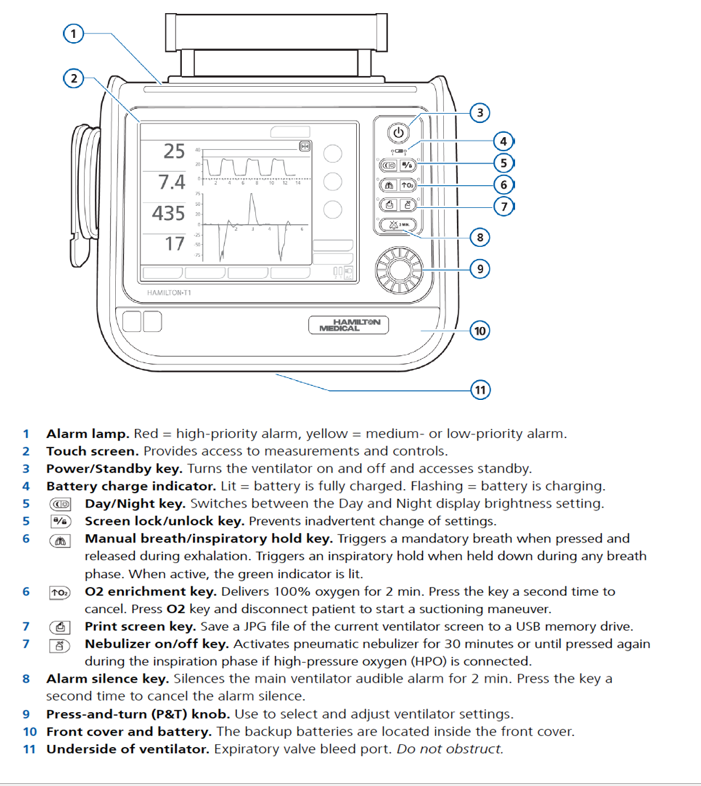
CAUTION: The Hamilton-T1 as fielded by the Department of Defense DOES NOT support noninvasive ventilation (NIV). In environments where there is a risk of patients requiring NIV, a different ventilator should be fielded.
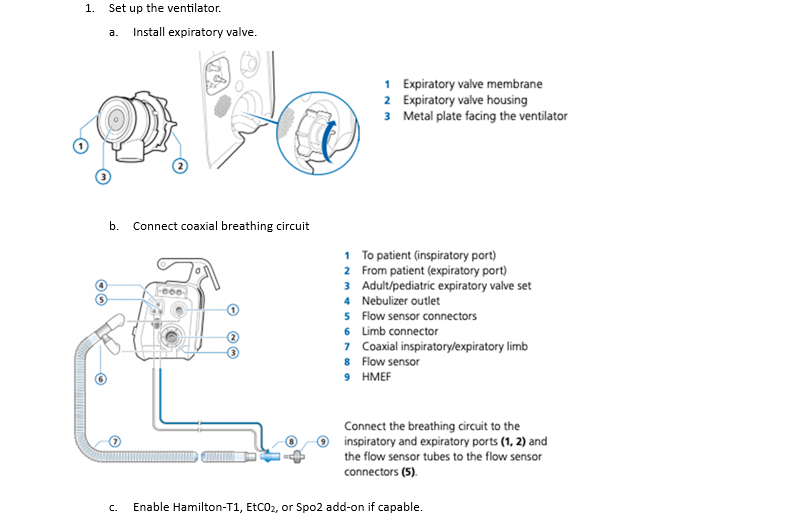
2. Perform pre-operational checks.
a. Click PreOp Checks on main page.
b. Conduct Tightness Test.
c. Conduct Flow Sensor Test.
**Do not attach a patient to the ventilator without conducting both tests.**
3. Select modes
a. Input patient Sex and Height (this calculates all alarm values and “normal” ranges. Do not bypass this step)
b. Touch Modes to change ventilator mode.
c. Select ASV.
4. Select settings
a. Set Tidal Volume (4-8 ml/kg IBW) or Pressure Support (not to exceed 30 mmHg).
NOTE: This ventilator is “PEEP Compensated” which means when in Pressure Support mode if your Pressure Support is 20 and your PEEP is 10, your settings are actually 30 over 10. If you want 20 over 10, you need to see the Pressure Support at 10 and the PEEP at 10.
**This can get confusing, seek direction from medical control if necessary.**
b. Set appropriate rate for age group.
c. Set Fi02 (21 to 100%).
d. Set PEEP (5 to 20).
e. Adjust I:E Ratio as necessary.
5. Set Flow Trigger (0.5 to 5). Press the start ventilation button prior to connecting patient.
6. Once the patient is on the ventilator, you may have to adjust alarm parameters
APPENDIX G: SAVE II
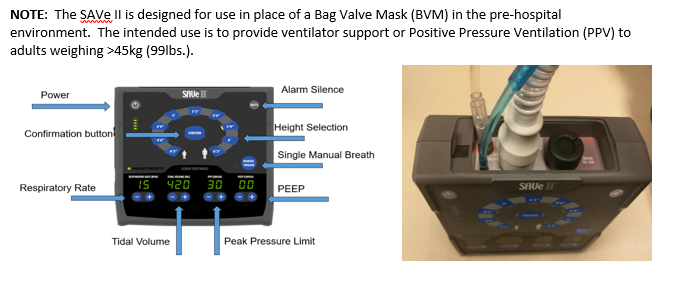
- Power on. The device will run through a self-test (all lights will illuminate, and will alarm for a moment).
- Connect tubing: Tubing will only attach one way. Ensure any patient circuit is being attached on the light grey side of ports, as pictured above. Ensure all connections of the circuit are tight; loose connections may cause low pressure or disconnect alarm.
- Select height and confirm (failure to select confirm will not change and or set appropriate settings). Any time a change is made, the CONFIRM button must be pressed. The device will default to a PEEP of 0; ensure adjustments are made IAW CPG or protocol.
- Attach to airway device.
- Confirm ventilations.
- Adjust PEEP if needed by setting PEEP and hitting confirm.
NOTE: This device is intended for short term or transport use, and is not intended to replace other ventilators available. Consider transitioning the patient to another ventilator (731, 754, or Hamilton T1) as soon as feasible.
APPENDIX H: VENTWAY SPARROW
NOTE: The Ventway Sparrow is a POI and Transport Ventilator with both Pressure and Volume control modes. The ventilator is applicable to adults and pediatric patients weighting >5 kg (11lb.)
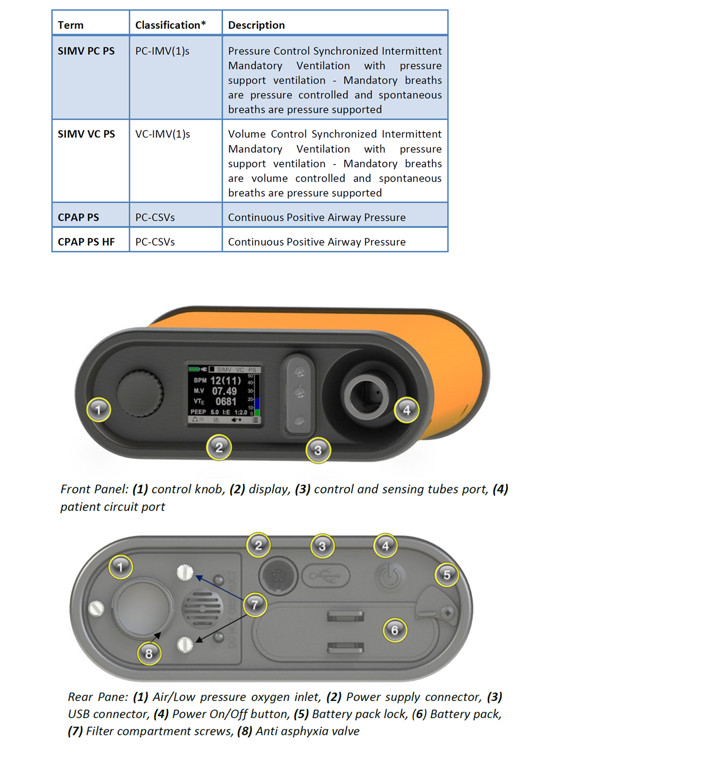

1. Power on. Press the on button for three seconds on the rear panel.
2. Connect tubing: Tubing will only attach one way. Ensure any patient circuit is being attached on the dark grey side of ports, as pictured above. Ensure all connections of the circuit are tight; loose connections may cause low pressure or disconnect alarm. Do not connect patient to tubing until confirmation of vent settings is made.
3. Selecting Screen options. To navigate between the screen options, turn the control knob on the left side of the device. When the desired option has been marked by positioning the marker on its location, press the knob to select the option.
4. Editing Fields. While turning the control knob, fields that can be modified are highlighted. To edit a field, press the control knob when positioned on the field. The field will change color. Rotate the control knob to view different values for the field and press the knob to select a value.
NOTE: When the field changes to red, it means that the selection exceeds the normal setup related to the patient weight or type.
5. Starting Ventilation. Select “Start Vent”. Patient Weight will be in Kg. Initial weight will be for pediatric patients, and you will need to scroll to find adult weight parameters.
NOTE: Setting patient weight will automatically set all ventilation parameters.
NOTE: Selecting “new patient” will clear all previous ventilator settings.
6. Ventilation mode. Ensure patient meets criteria for ventilation management. Select appropriate mode.
7. Ventilation parameters.
a. BPM/RRate: 14BPM (10-30 range)
b. TIDAL VOLUME: The sparrow auto-defaults VT based on ideal body weight you have selected on the prior screen. If those volumes do not work, manually adjust the VT to: 6ml/kg IBW (4-8ml/kg IBW range)
QUICK REFERENCE (Male): (Detailed quick reference in Appendix C)
66” = ~380cc [min: 255 / max: 510]
69” = ~420cc [min: 283 / max: 566]
72” = ~465cc [min: 310 / max: 621]
75” = ~505cc [min: 338 / max: 676]
c. FiO2 : 21 - 100% (0.21-1.0) (low flow O2 @ 3 LPM = ~ 40% FiO2 [flowrate on Saros oxygen concentrator])
d. I:E Ratio: 1:2
e. PEEP: 5 [Range 5-20]
8. Monitor waveform on the machine and visually inspect the patient to ensure no “breath stacking.” If this occurs, a high-pressure alarm may sound. However, if breath stacking is suspected even in the absence of alarm – disconnect tubing and allow exhalation and decrease the I:E if possible, from 1:2 to 1:4.
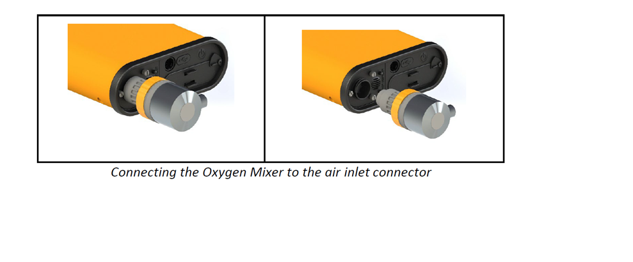
9. When a high-pressure oxygen source that is connected to an Oxygen Mixer is not available, the Ventway Sparrow ventilator can accept oxygen from a low-pressure oxygen source such as an oxygen enrichment kit connected to a flow meter.
To do this, use an optional low-pressure oxygen enrichment system attached to the ventilator air inlet port through an optional Ventway adapter.
Adjust the “O2 coefficient” parameter on the device through the O2 enrichment screen, which can be found under the VENT. PARAMS screen, so that the coefficient is aligned with the actual FiO2 value given to the patient. Select the "O2 ENRICHMENT" option in the VENT. PARAMS menu. The FiO2 value must be measured with a calibrated external oxygen analyzer. If a high-pressure oxygen source is available, an Inovytec-approved Oxygen Mixer can be used to connect to the air inlet port, delivering between 30% to 95% FiO2 to the patient. Measure FiO2 with a calibrated external oxygen analyzer. The oxygen supply pressure shall be according to manufacturer specifications (usually 40-60 psi).
APPENDIX I: CLASS VIII MEDICAL MATERIEL
1. Mechanical Ventilation Equipment
- Mechanical Ventilator (e.g., Impact 754, Zoll EMV+ 731 series, Hamilton-T1, SAVE II, or equivalent field-capable ventilator)
- Ventilator Circuits (disposable or reusable, compatible with ventilator)
- Humidifiers or Heat and Moisture Exchangers (HMEs)
- Bacterial/Viral Filters
2. Airway Management Equipment
- Endotracheal Tubes (ETT) (sizes 6.0–8.5 mm, cuffed)
- Supraglottic Airway Devices (e.g., i-gel, King LT, LMA)
- Laryngoscope with Blades (curved Macintosh and straight Miller, various sizes)
- Video Laryngoscope (if available)
- Stylets & Bougies (for difficult intubations)
- Suction Apparatus with Suction Tubing (tubing from device to catheter and device to collection chamber)
- Suction Collection Chamber
- Yankauer & Flexible Suction Catheters
- Cricothyrotomy Kit (scalpel, endotracheal tube, bougie, etc.)
- Endotracheal Tube (ETT) Securement Devices
- Manual Resuscitator (Bag-Valve Mask, BVM) (with oxygen reservoir)
- 10 cc Syringe
- Cuff Pressure Manometer (consumable or non-consumable versions)
3. Oxygen Supply & Delivery
- Portable Oxygen Cylinders or Oxygen Concentrator
- Oxygen Hose
- Oxygen Regulators & Flowmeters
- Oxygen Delivery Accessories (nasal cannulas, non-rebreather masks, simple face masks)
- End-Tidal CO₂ (EtCO₂) Detector or Capnography Device
- Low Flow Oxygen Reservoir (if applicable to your ventilator)
4. Monitoring & Diagnostics
Vital Sign & Ventilation Monitoring
- Pulse Oximeter
- Capnography Device (EtCO₂ monitor, waveform preferred) and tubing
- Portable Blood Pressure Cuff & Stethoscope
- ECG Monitor
Arterial Blood Gas (ABG) Management
- Arterial Line Kit (including catheter, guidewire, pressure tubing and transducer)
- ABG Syringes (Heparinized)
- Needles (20-25 gauge for arterial punctures)
- Alcohol Prep Pads & Betadine Swabs
- Gauze & Adhesive Dressings
- Elastic Bandage
- Sterile Gloves
- Local Anesthetic (Lidocaine 1% or 2%) (for arterial line placement)
- Pressure Bag for Arterial Line
- Sterile Transparent Dressing
- Portable ABG Analyzer (if available)
- Point-of-Care Blood Gas Cartridge Kits (compatible with ABG analyzer)
- Blood Gas Sample Transport Containers (if sending to lab)
5. Emergency & Backup Equipment
- Alternative Airway Devices (e.g., King LT, LMA)
- Needle Decompression Kit (for suspected tension pneumothorax)
- Chest Tube Insertion Kit (if managing pneumothorax in ventilated patients)
- Portable Suction Device
- Emergency Medications (Sedation & Paralysis if needed for mechanical ventilation)
- Ketamine
- Etomidate
- Rocuronium/Vecuronium
- Midazolam/Diazepam
- Fentanyl/Morphine
- Propofol
6. Consumables & Miscellaneous Supplies
- IV Fluids (Normal Saline, Lactated Ringer’s)
- IV Administration Sets & Extension Tubing
- IV Catheters (Various Sizes)
- Saline Lock IV Connector
- Disposable Gloves, Masks, Gowns, Eye Protection (PPE)
- Sterile Drapes & Adhesive Tapes
- Labels for Blood Gas Samples
- Sharps Containers
- Portable Documentation Tools (Paper or Digital for ABG and Ventilator Settings Tracking)
- 10 cc Normal Saline Flushes
This comprehensive list covers mechanical ventilation materials in Role 1-3 settings.
For additional information including National Stock Number (NSN), refer to Logistics Plans & Readiness (sharepoint-mil.us)
DISCLAIMER: This is not an exhaustive list. These are items identified to be important for the care of combat casualties.
APPENDIX J: TELEMEDICINE/TELECONSULTATION
APPENDIX K: INFORMATION REGARDING OFF-LABEL USES IN CPGS
The purpose of this Appendix is to ensure an understanding of DoD policy and practice regarding inclusion in CPGs of “off-label” uses of U.S. Food and Drug Administration (FDA)–approved products. This applies to off-label uses with patients who are armed forces members.
Unapproved (i.e. “off-label”) uses of FDA-approved products are extremely common in American medicine and are usually not subject to any special regulations. However, under Federal law, in some circumstances, unapproved uses of approved drugs are subject to FDA regulations governing “investigational new drugs.” These circumstances include such uses as part of clinical trials, and in the military context, command required, unapproved uses. Some command requested unapproved uses may also be subject to special regulations.
Additional Information Regarding Off-Label Uses in CPGs
The inclusion in CPGs of off-label uses is not a clinical trial, nor is it a command request or requirement. Further, it does not imply that the Military Health System requires that use by DoD health care practitioners or considers it to be the “standard of care.” Rather, the inclusion in CPGs of off-label uses is to inform the clinical judgment of the responsible health care practitioner by providing information regarding potential risks and benefits of treatment alternatives. The decision is for the clinical judgment of the responsible health care practitioner within the practitioner-patient relationship.
Consistent with this purpose, CPG discussions of off-label uses specifically state that they are uses not approved by the FDA. Further, such discussions are balanced in the presentation of appropriate clinical study data, including any such data that suggest caution in the use of the product and specifically including any FDA-issued warnings.
With respect to such off-label uses, DoD procedure is to maintain a regular system of quality assurance monitoring of outcomes and known potential adverse events. For this reason, the importance of accurate clinical records is underscored.
Good clinical practice includes the provision of appropriate information to patients. Each CPG discussing an unusual off-label use will address the issue of information to patients. When practicable, consideration will be given to including in an appendix an appropriate information sheet for distribution to patients, whether before or after use of the product. Information to patients should address in plain language: a) that the use is not approved by the FDA; b) the reasons why a DoD health care practitioner would decide to use the product for this purpose; and c) the potential risks associated with such use.

