Module 17: Wound Management
Joint Trauma System
Wound Management
This module discusses wound management in the Tactical Field Care (TFC) setting, highlighting actions you should take as a Combat Medic.
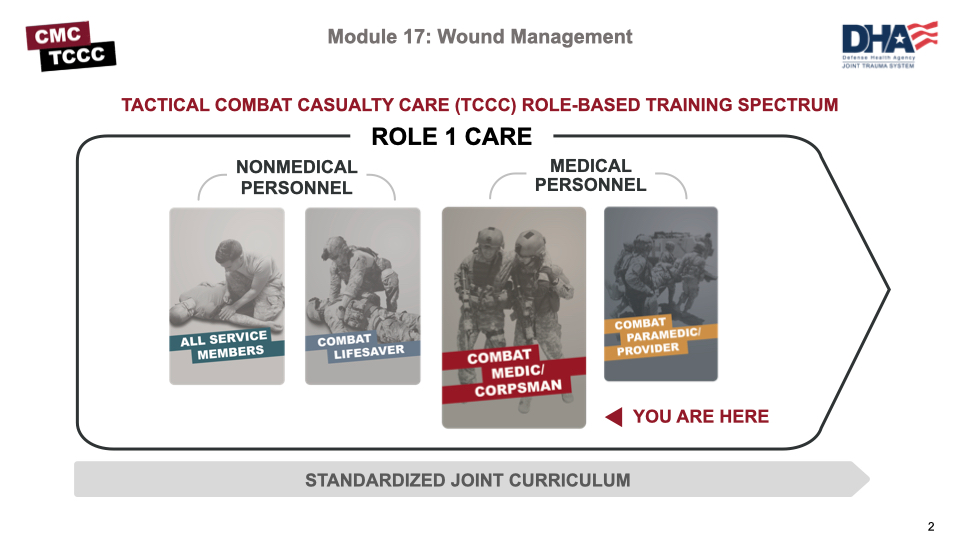
All Service Member and Combat Lifesaver training trains non-medical personnel about basic wound management, but as a Combat Medic, your skillset is more advanced and allows you to manage wounds that cannot be addressed by the other levels of care.
There is one cognitive and one performance enabling learning objective in this module.
After this module, you should be able to identify wound management considerations in Tactical Field Care. This will include general wound management principles, open abdominal wounds, impaled objects, and dressing amputations.
Also, you will demonstrate the application of open abdominal, impalement, and amputation wound dressings in the skills station.
In general, this means recognizing non-life-threatening wounds, knowing the steps to treat them and when in the treatment sequence they should be addressed, and then being able to demonstrate how to apply wound dressings to those injuries.

Wound management is the “W” in the MARCH PAWS sequence.
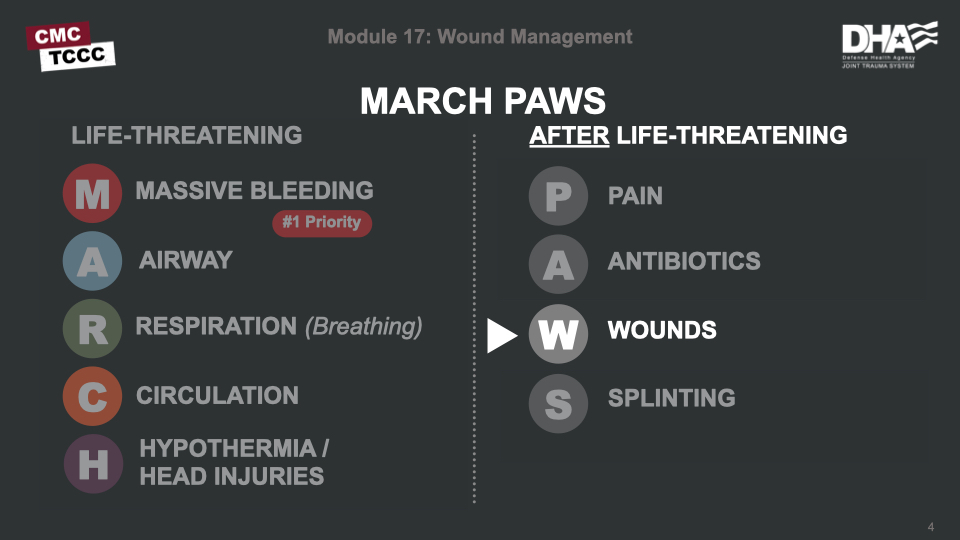
The TCCC Wound Management Guidelines state “inspect and dress known wounds” and later “check for additional wounds,” with more a comprehensive discussion of open abdominal wounds.
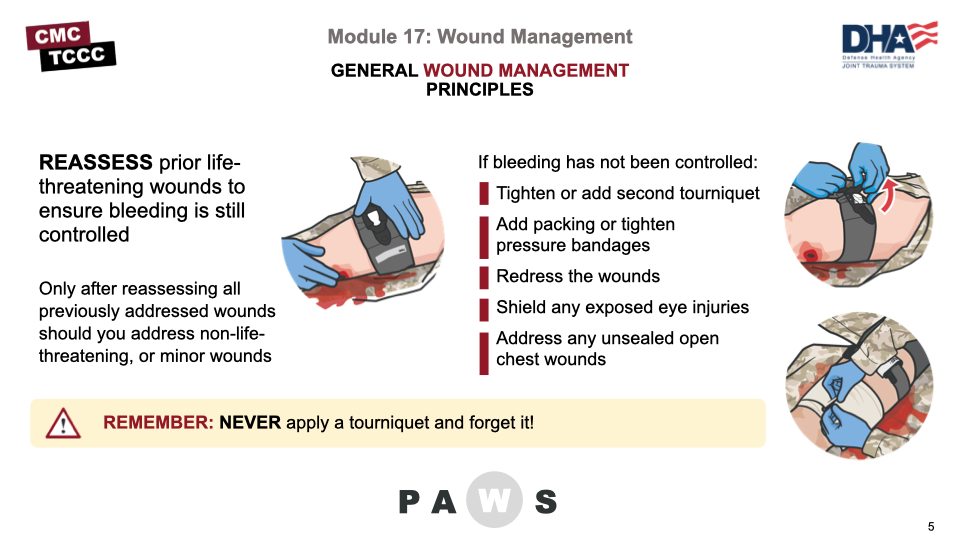
But prior to addressing new non-life-threatening wounds, it is important to reassess any wounds that have previously been addressed to ensure prior interventions were successful and the casualty’s status hasn’t changed. This frequent reassessment should be an ongoing process, and not restricted to a specific step in the casualty management process. Do not apply and then forget any intervention.
For bleeding, this means rechecking any tourniquets to confirm hemorrhage control and absent distal pulses, if appropriate. Wound packings and pressure dressings and junctional tourniquets can be reassessed to ensure there isn’t evidence of ongoing bleeding.
Options to consider if there are any signs of recurrent or persistent bleeding include:
- Retightening tourniquets or adding additional tourniquets
- Adding additional packing or pressure dressings
- Repacking and applying new pressure dressings
- Shielding any eye injuries that are still exposed/unshielded
- Addressing any open chest wounds that are not properly sealed
Any interventions that are repeated should follow the same process that is appropriate for a newly found life-threatening wound. For example, if repacking a wound, you should ensure that pressure is held for a full 3 minutes before checking for hemorrhage control and applying a pressure bandage.
Only after reassessing all previously addressed wounds and confirming that a life-threatening wound hasn’t been missed, and treating any of those that warrant treatment, should you go on to address non-life-threatening or minor wounds.
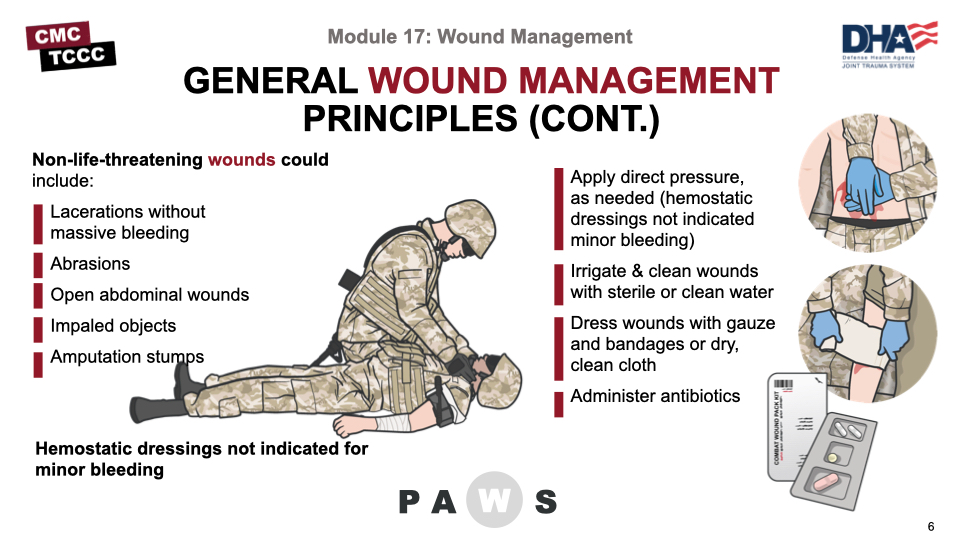
Once you have reassessed any prior treatments, other wounds should be addressed. In a bit, we’ll talk about three specific wounds – open abdominal wounds, impaled objects, and amputations – but there are some general wound management considerations that apply to these and all other minor or non-life-threatening wounds. Examples of these are minor lacerations or abrasions.
It may be necessary to apply direct pressure for a period of time to help a minor wound stop bleeding, but hemostatic dressings and pressure bandages are not normally indicated in this setting.
Next, irrigate and clean wounds with either sterile water, if it is available, or even clean water if your supplies are limited or you have no access to sterile water. The goal is to clean the wound and remove obvious foreign debris but not to sterilize it; so, the irrigation should be thorough but not excessive.
Once irrigated, wounds can be dressed. If supplies are available and not needed for more serious wounds or other casualties, you can apply sterile dressings and/or gauze with bandages or tape. But it may also be necessary to conserve those supplies, and clean dry cloths may be used and either tied in place or secured with tape. Conserve your hemostatic agents and pressure bandages for sources of more serious hemorrhage.
As highlighted in Module 16, all open wounds warrant early antibiotic administration. If the casualty can swallow, have them take the moxifloxacin from their Combat Wound Medication Pack. If they cannot take PO meds, are unconscious, or in shock, they should be given one gram of ertapenem by intramuscular, intravenous, or intraosseous injection or infusion.
If the casualty is evacuated to a higher level of care, the wounds will be readdressed at that point, and decisions about the need for debridement, tetanus immunization boosters, and maintenance (or changes) in antibiotics will be made. If the casualty can return to the fight, you will need to address those concerns over the next several days as you see the casualty again for reassessment of their wounds.
Open abdominal wounds merit more in-depth discussion, especially in light of the recent TCCC Guideline updates from 2021, which provide more detailed recommendations for the management of this wound pattern.
These wounds have several potentially serious complications including:
- Increased risk of hypothermia – insensible heat losses from the evaporative process from the open abdomen
- Fluid loss – dehydration from the evaporative processes
- Internal hemorrhage – significant volume of pooled blood or ongoing hemorrhage may not be visible at the surface
- Infections – both from the nature of the injury and from potential bowel perforation
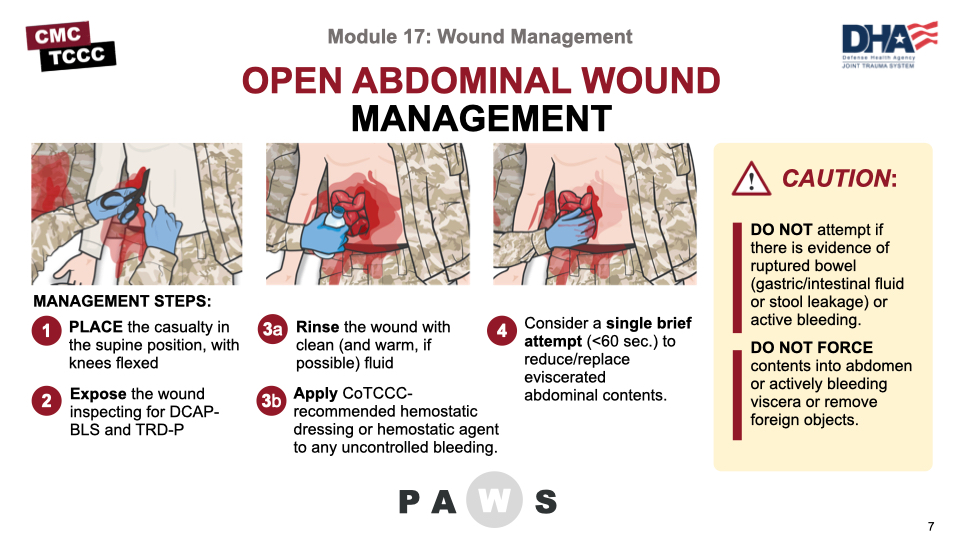
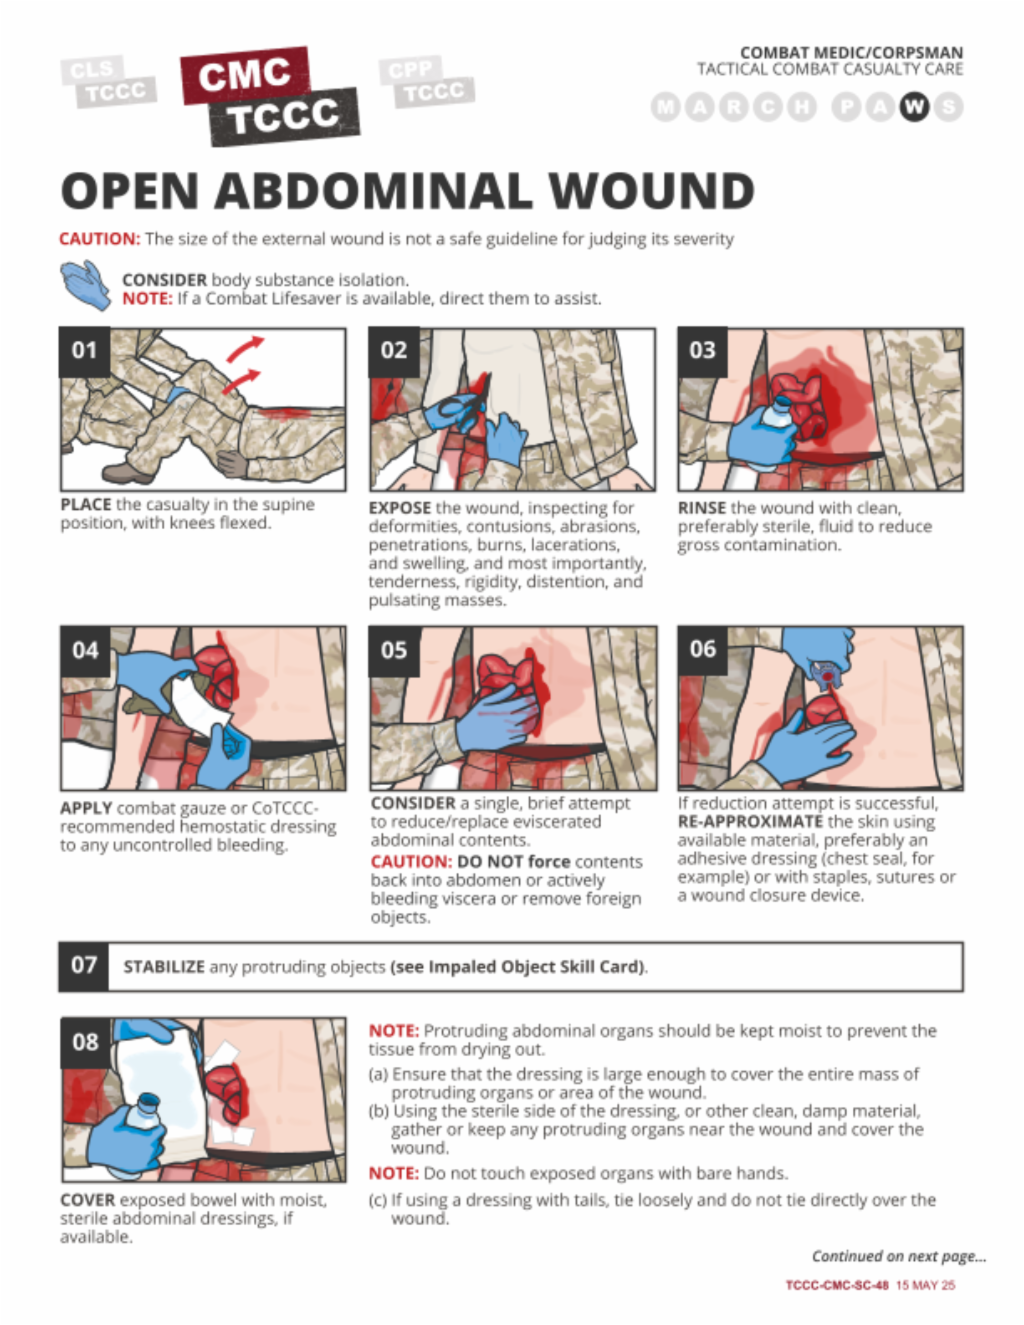
Management of an open abdominal wound involves several steps:
- Irrigate with clean, preferably sterile, fluid to reduce gross contamination
- Control hemorrhage, if applicable, to include using hemostatic agents
- If bowels are exposed, a single (ONE-time) attempt to reduce the evisceration without forcing contents back into the abdomen can be made
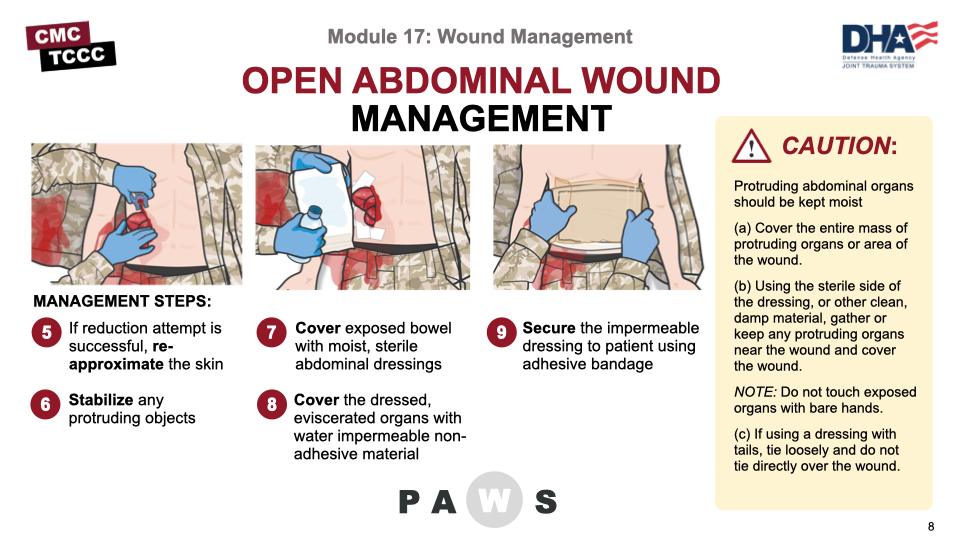
Management of an open abdominal wound steps continued:
- If reduction attempt is successful, re-approximate the skin using available material, preferably an adhesive dressing (chest seal, for example) or with staples, sutures or a wound closure device.
- Stabilize any protruding objects
- Cover exposed bowel with moist, sterile abdominal dressings, if available (and keep wet)
- Cover dressing with water-impermeable non-adhesive material (preferably transparent like a plastic wrapper, IV bag, clear food wrap, etc.), and then secure it in place with tape or some other adhesive material DO NOT apply pressure on the wound or further expose internal organs. Prevent hypothermia
- Secure the impermeable dressing to the patient using adhesive bandage (examples: medical tape, chest seal, etc.).
NOTE: If an adhesive bandage isn’t available, loosely cover the dressing with cravats and tie them on the side of the casualty opposite that of the dressing ties (if present).
NOTE: Use multiple dressings and cravats, if needed, to cover a large wound, ensuring tails of additional dressings are not tied over each other.
Management of an open abdominal wound steps continued:
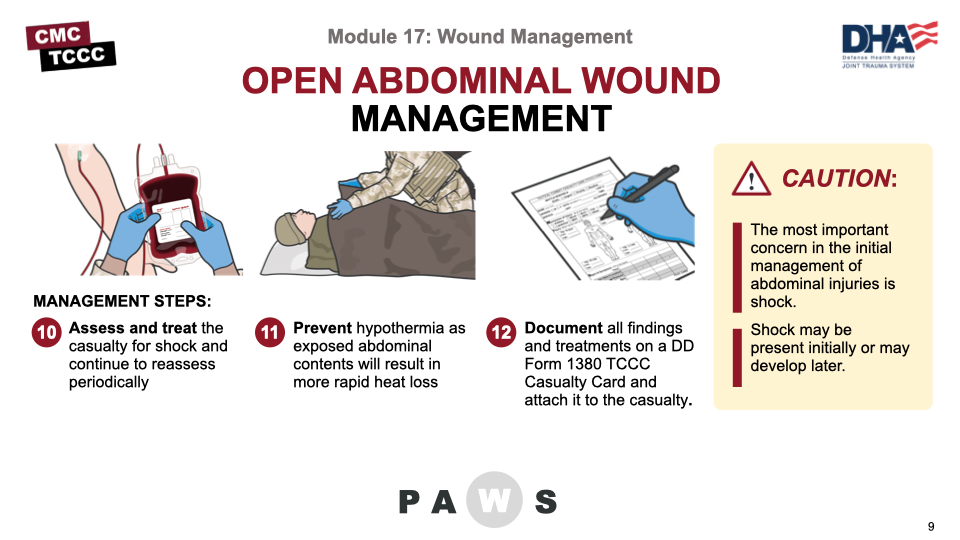
- Assess and treat the casualty for shock and continue to reassess periodically.
NOTE: The most important concern in the initial management of abdominal injuries is shock.
CAUTION: Shock may be present initially or may develop later.
- Prevent hypothermia as exposed abdominal contents will result in more rapid heat loss.
- Document all findings and treatments on a DD Form 1380 TCCC Casualty Card and attach it to the casualty.
There are a few additional caveats that should be kept in mind, as well. It is okay to give oral antibiotics, as the absorptive/digestive functions of the bowel have not been compromised, so advise the casualty to take the antibiotic from their Combat Wound Medication Pack. These casualties are at high risk for shock and should continuously be reassessed for the signs and symptoms of shock. If the casualty presents late (the injury occurred quite a while earlier), a single reduction attempt is still appropriate, but the odds of success are lower. If potential evacuation to surgical care is uncertain, you may decide not to attempt a reduction.
It is also important to note that closed abdominal injuries from blast exposure can be a significant problem. In some studies, they appear to be as frequent as pulmonary blast injury. Complications include infections from ruptured bowel, internal bleeding, and solid organ damage. Presenting signs are often unexplained nausea and vomiting and/or abdominal pain. There is nothing specific that can be done in the field to diagnose or manage these complications, but awareness of their potential presence may save the casualty’s life if they are communicated with the medical team receiving the casualty.
The casualty should remain NPO
This video will demonstrate the management of an open abdominal wound in a Tactical Field Care setting.
MANAGING AN OPEN ABDOMINAL WOUND
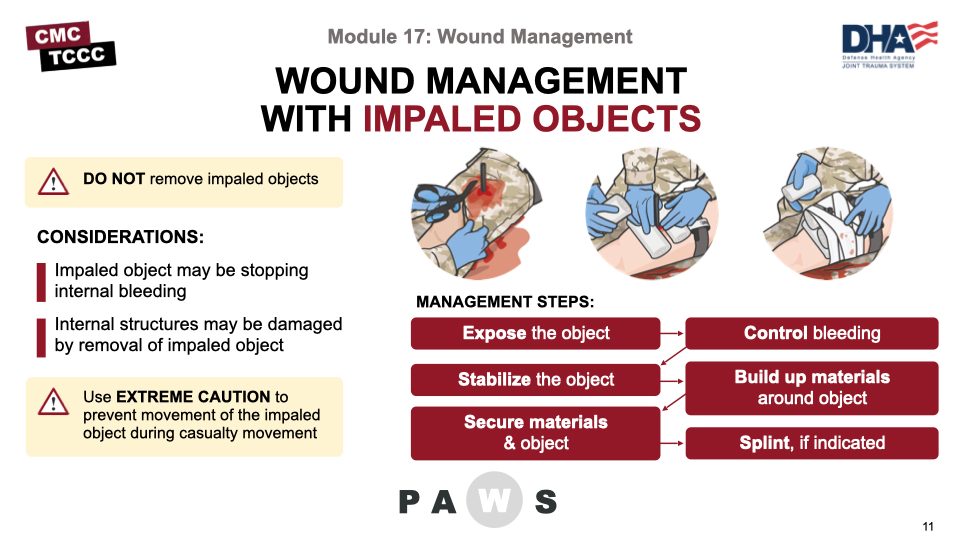
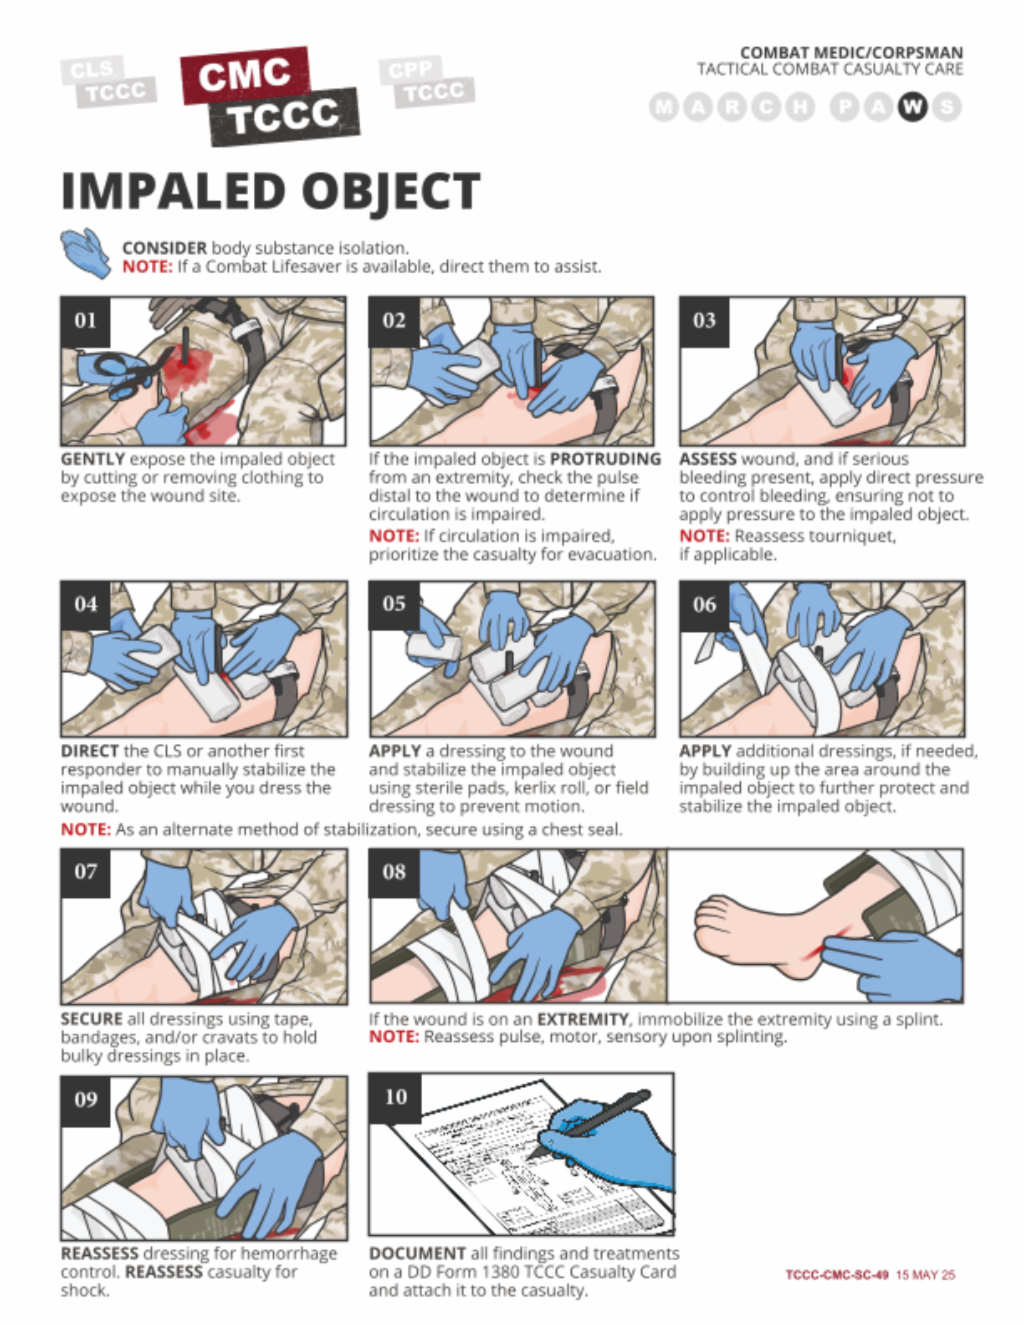
Impaled objects present some unique problems in wound management. In many cases, the removal of an impaled object can cause additional internal (and external) hemorrhage, particularly if it is not located on an extremity. The structures at the base of the impaled object may be compromised, depending on the shape of the object, when it is removed. So, taking an x-ray or other image to determine the risks of removal and then removing it in a more controlled environment is preferred. This is definitely true in the tactical environment, where impaled objects should be left in place and the casualty should be evacuated to a facility that has the capability to deal with impalements.
Prior to stabilizing a protruding object, the site needs to be exposed and any bleeding needs to be controlled. The exposure usually just requires that the clothing around the site be cut free or removed. If parts are pinned in by the object, then cut the rest of the clothing free. For bleeding control, direct pressure can be applied at the base of the impaled object, and hemostatic dressings and pressure bandages can be applied, if applicable. However, it is difficult to achieve and maintain good direct pressure with some impalements, and early consideration to tourniquet application should be considered if bleeding persists. Also, check the pulse distal to the impalement if found on an extremity, to know whether vascular compromise is probable, as this information will facilitate proper treatment once the casualty is evacuated.
Stabilization is generally best done with at least one assistant. While one person keeps the object in position and stable, the other can begin to work around the base of the object. Using locally available bulky materials, and starting at the wound edges around the impaled object, these materials can be built up to form a base. Do not exert pressure on the tissues around the object building the base, except to control bleeding, particularly if it is located in the eye. Examples of materials include medical supplies like gauze, rolls of kerlix, pads or dressings, or non-medical supplies like clean, dry cloth or flexible padding materials. Once the object has been encircled and a base of materials appropriate for the length of the object has been built, the base needs to be secured. This can be done with adhesive seals, like tape or by using cloth strips, cravats, or bandages tied in place to hold the base materials against the impaled object.
If the impalement is on an extremity, treat it like a fracture and stabilize the joint above and below the location of the object with splints. This will provide added protection against unintended movement. Reassess distal pulses after dressing and splinting on an extremity.
Regardless of the location, reassess to ensure bleeding has been controlled, the casualty is not in shock, and the object is secured.
Although there may be a unique situation when an impaled object prevents casualty movement or evacuation, those situations are unusual and, as a rule, the object should not be shortened for convenience of transport. Only if it will prevent evacuation should modification of a portion of the protruding object be considered, and then with extreme caution to prevent movement of the impaled part of the object during the modification process.
This video will demonstrate the management of an impaled object in a Tactical Field Care setting.
MANAGING AN IMPALED OBJECT
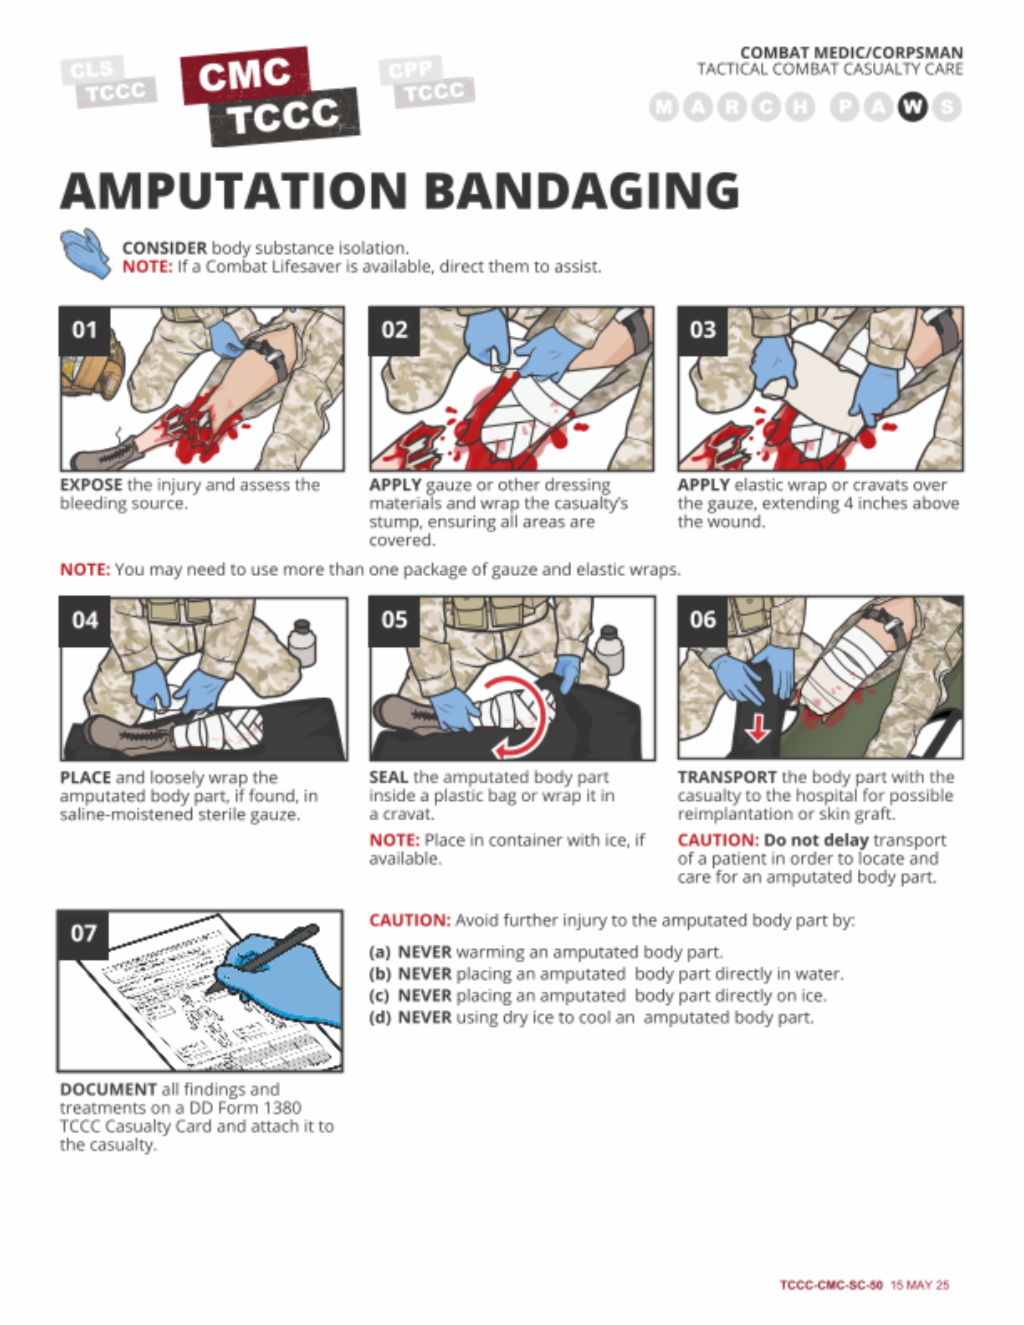
Caring for the wounds associated with an amputation is different than other minor wounds or other dressings.
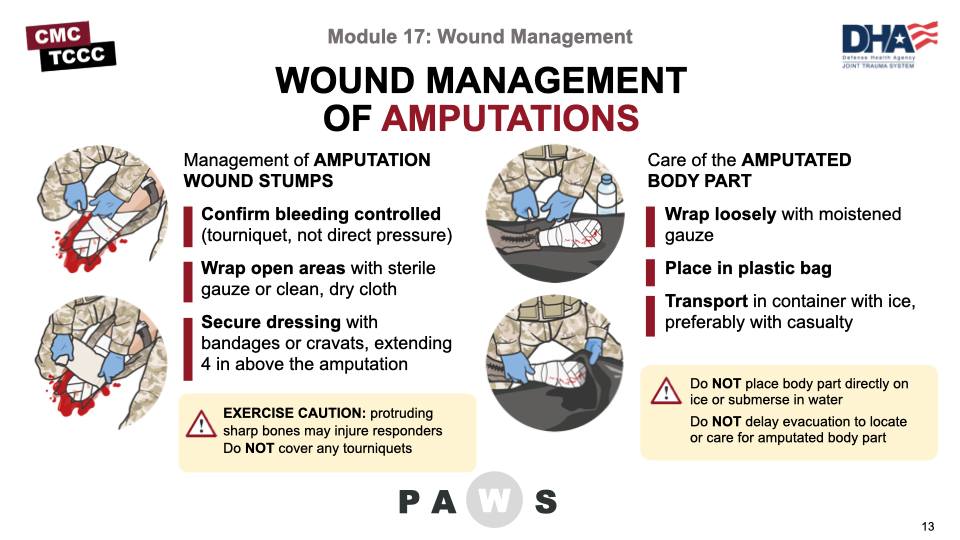
The control of bleeding is not accomplished through direct pressure at the stump but through the use of the tourniquet applied above the amputation; so, any persistent bleeding that might be present must be resolved by further tightening of the tourniquet or application of a second tourniquet proximal to the first. Prior to dressing an amputation wound, the hemorrhage must be controlled.
As the amputation is often very irregular, it may take significant amount of gauze or dressing to wrap the casualty’s stump. It is also important to exercise caution in applying the gauze, as it is not uncommon for sharp bones to protrude and potentially injure the responders. Once the entire area is covered in gauze or dressings, bandages or cravats can be applied to keep everything in place, extending up 4 inches proximal to the edges of the stump. Be sure NOT to cover the tourniquets, though, in case they need to be accessed quickly.
In addition to dressing the stump, you must also take care of the amputated body part.
Wrap the amputated body part loosely with moistened gauze. If possible, place it in a plastic bag; if not, wrap it with cravats to cover all of the gauze. Then, place the bag, or the cravat-covered body part, in a container with ice, if available. Keep in mind that you do NOT want to have the body part directly in contact with the ice or submersed in water. And once cooled, maintain cooling throughout transport (avoid allowing the body part to warm because of a lack of ice or refrigeration).
The body part should accompany the casualty for potential reimplantation or use for skin grafting. But an evacuation should not be delayed to locate or care for an amputated body part.
This video will demonstrate how to bandage an amputation stump and care for the amputated body part in a Tactical Field Care setting.
AMPUTATION BANDAGING
This module highlighted the wound management principles you should know for Tactical Field Care.
We discussed general wound management principles and then went into more detail on open abdominal wounds, impaled objects, and dressing amputations.
Also, you demonstrated the application of open abdominal, impalement, and amputation wound dressings in the skills station.
To close out this module, check your learning with the questions below (answers under the image).
ANSWERS
After applying pressure to stop bleeding, if necessary, what is the next step in treating a minor wound?
Next, irrigate and clean wounds with either sterile water, if it is available, or even clean water if your supplies are limited or you have no access to sterile water.
Name three of the four complications of open abdominal wounds.
- Increased risk of hypothermia – insensible heat losses from the evaporative process from the open abdomen
- Fluid loss – dehydration from the evaporative processes
- Internal hemorrhage – significant volume of pooled blood or ongoing hemorrhage may not be visible at the surface
- Infections – both from the nature of the injury and from potential bowel perforation
If an impaled object is on an extremity, what do you need to do in addition to stabilizing the object?
If the impalement is on an extremity, treat it like a fracture and stabilize the joint above and below the location of the object with splints.
How do you care for an amputated body part?
Wrap the amputated body part loosely with moistened gauze. If possible, place it in a plastic bag; if not, wrap it with cravats to cover all of the gauze. Then place the bag, or the cravat-covered body part, in a container with ice, if available.